
Microsoft 365 DLP Integration and Monitoring
Summary of Actions Required:
Register an app in Microsoft Entra ID and configure API permissions for Microsoft Graph and Office 365 Management APIs. Grant admin consent and collect credentials (Application ID, Tenant ID, Client Secret). Ensure Unified Audit Logging is enabled in Microsoft 365.
Pre-requisites:
-
Global Admin access
-
Microsoft 365 E5 or Compliance add-on licenses
-
Required roles: Compliance Administrator, Security Reader, Global Reader, or a custom role with DLP alert access
DLP Alerts:
-
Go to Microsoft Purview Portal > Data Loss Prevention > Alerts
-
Ensure DLP policies are set to generate alerts
Important Note on Microsoft 365 Alert API Limitations
There is an inherent limitation in the Microsoft 365 Security Alert APIs that impacts the level of detail you receive in alert data—this is critical when planning your integration and choosing the appropriate license tier.
License Implication:
Our Position:
In Microsoft 365 E3, the information from the v1.0 API is sufficient to initiate timely investigations.
However, depending on your operational requirements, you may need to assess whether the basic alert data is adequate or if the richer, contextual insights of v2.0 are necessary for your workflows.
Consider this carefully when designing your alert ingestion pipeline or evaluating Microsoft 365 licensing options.
Step 1: Microsoft Entra ID - App Registration
Register Your Application in Microsoft Entra ID:
-
-
Log in to your Azure Account, click here - Azure Portal Link.
-
Navigate to Azure Active Directory > App registrations.
-
Click New Registration.
-
Provide a Name for the application, we can suggest "CyTechAQUILA-Monitoring".
-
Click Register.
-
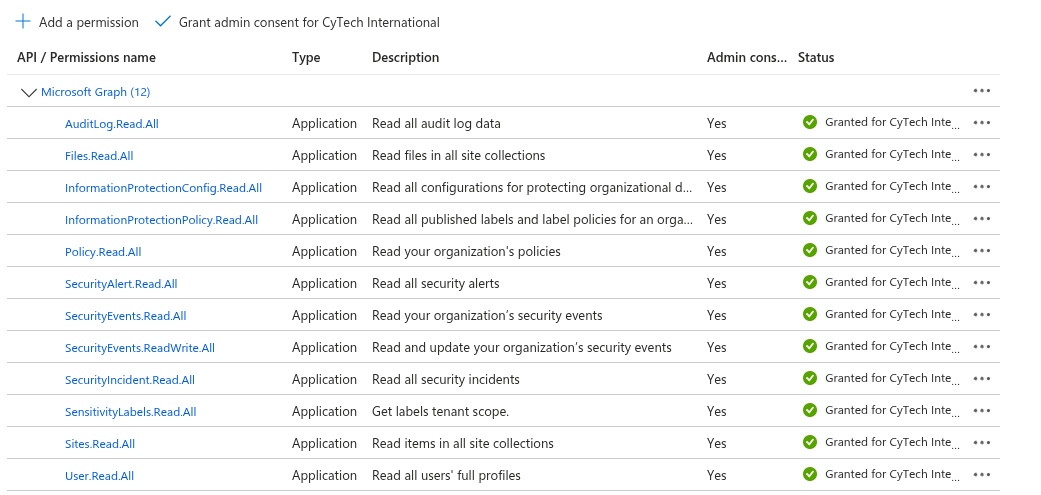
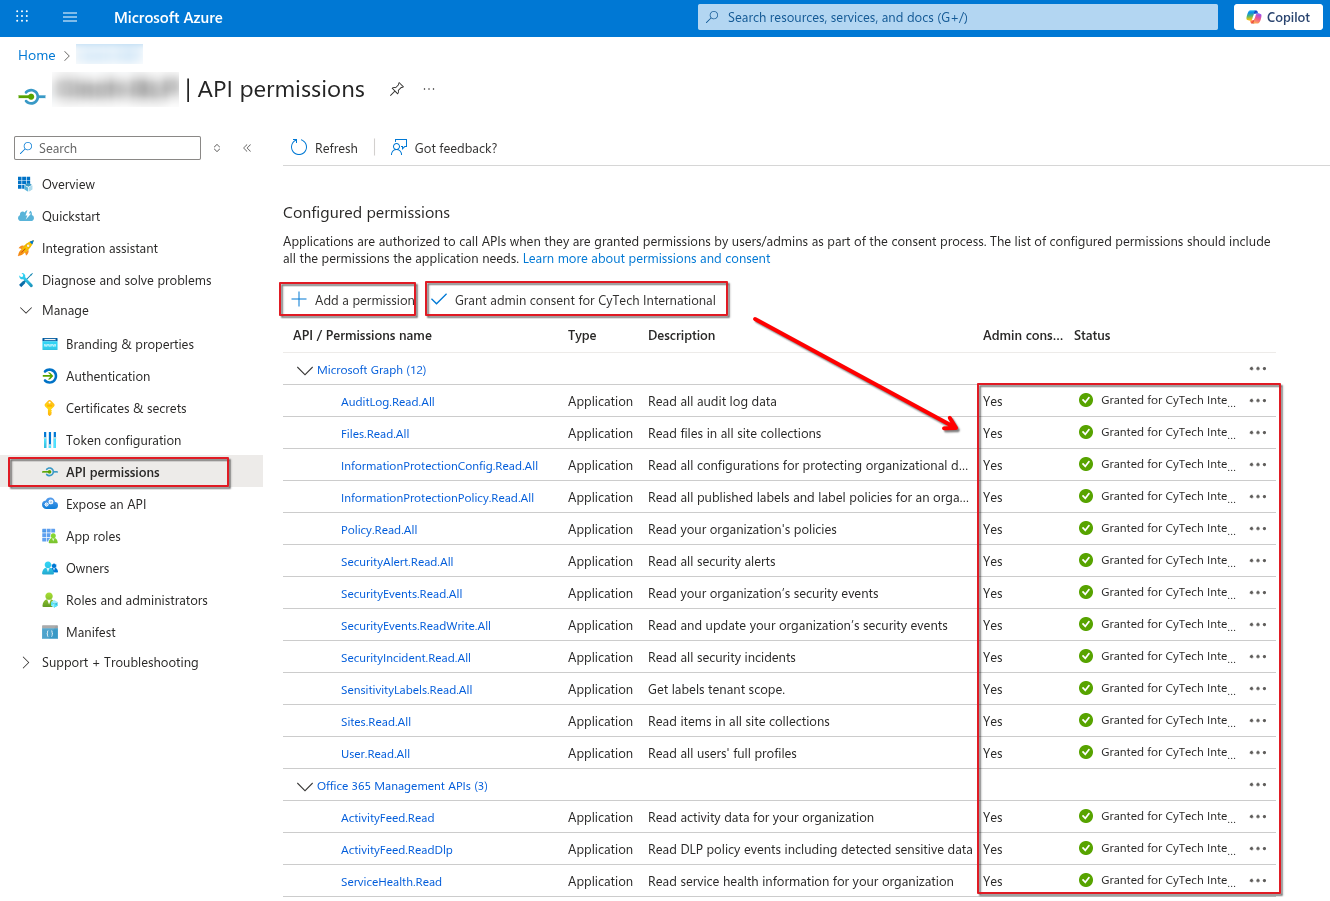
Step 2: API Permissions
Microsoft Graph API Permissions:
Office 365 Management API Permissions:
-
- Search for Office 365 Management APIs and add the required permissions.
-
In Application Permissions, look for permissions.
- To read DLP policy events under ActivityFeed select:
- ActivityFeed.Read
- ActivityFeed.ReadDlp
- ServiceHealth.Read

Grant Admin Consent:
-
-
In API Permissions, click Grant admin consent for <tenant name>.
-
Confirm the action.
-
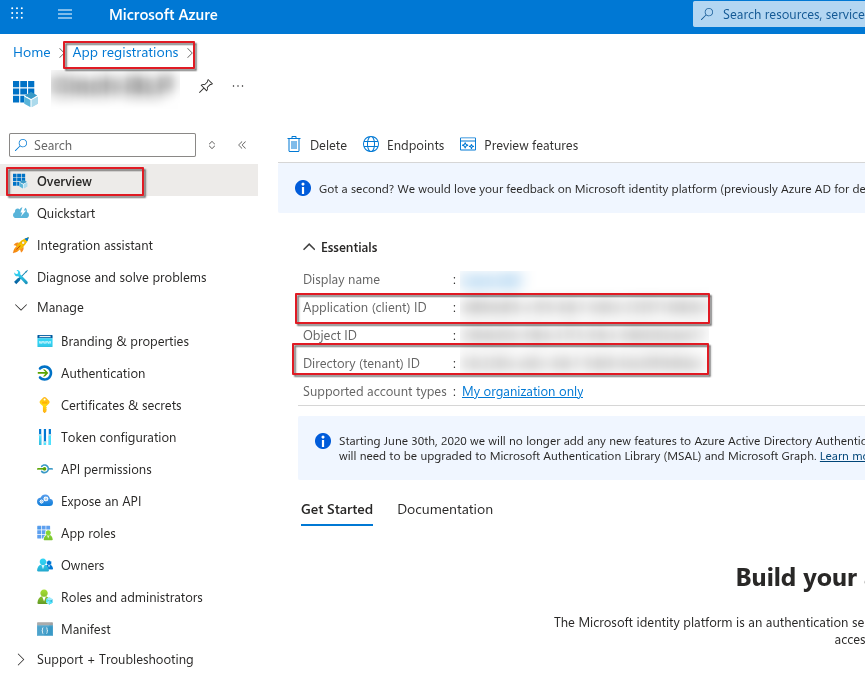
Step 3: Integration Requirements for Office 365
Application (Client) ID:
-
-
Go to App registrations > Select your application.
-
Copy the Application (client) ID from the overview page.
-
Directory (Tenant) ID:
-
-
In the Azure Portal, navigate to Azure Active Directory > Overview.
-
Copy the Directory (tenant) ID.
-
Create New Client Secret (Value):
-
-
In App registrations > Select your application, go to Certificates & secrets.
-
Click New client secret.
-
Add a description and expiration period, then click Add.
-
Copy the Value (displayed only once).
-

Step 4: Verify Unified Audit Logging is Enabled
Unified Audit Logging must be enabled before accessing data via the Office 365 Management Activity API.
Method 1: Using Microsoft 365 Security & Compliance Center
-
Sign in to Microsoft 365:
-
Go to https://admin.microsoft.com and sign in with your Global Admin credentials.
-
-
Access the Security & Compliance Center:
-
In the left-hand menu, under Admin centers, click on Security (or go directly to https://security.microsoft.com).
-
-
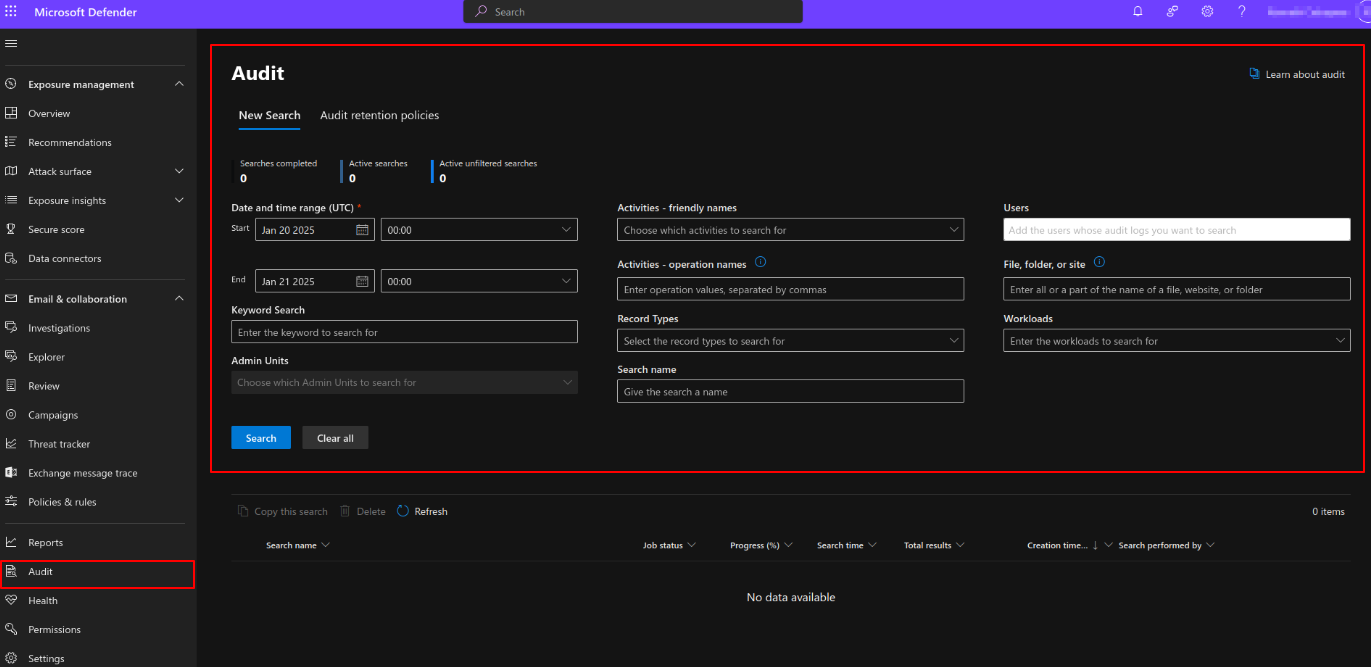
Navigate to Audit Log Search:
-
In the Security & Compliance Center, go to Search in the left-hand menu and click on Audit log search.
-
-
Check Audit Log Status:
-
If you see an option to search the audit log, then audit logging is already enabled(refer to the image below).
- If you see a banner that says "Start recording user and admin activity" or a prompt to enable auditing, it means that audit logging is not yet enabled.
-
-
Enable Audit Logging:
-
If audit logging is not enabled, you can click on the prompt to enable it. This will enable auditing for all activities within your Microsoft 365 environment. The process may take a few hours to be fully operational.
-
Microsoft Purview DLP Policy Creation – General Instruction Manual
Overview: Key Factors to Consider Before Creating a DLP Policy
Before you create any DLP policy, take time to understand and document the following:
1. Data Sensitivity and Classification
-
What types of sensitive information need protection?
-
e.g., Credit card numbers, health records, national IDs, business secrets
-
-
Are sensitivity labels already being used (e.g., “Highly Confidential”)?
2. Data Locations
-
Where does your organization store and share data?
-
Email (Exchange Online), OneDrive, SharePoint, Teams, Devices, or 3rd party apps
-
3. User Scope
-
Who should the policy apply to?
-
All users, specific departments (e.g., HR, Finance), or external collaborators?
-
4. Policy Actions
-
What should happen when sensitive data is detected?
-
Block sharing, restrict access, encrypt, notify, log for audit
-
5. Exceptions or Conditions
-
Are there any legitimate business needs that require exceptions?
-
e.g., Finance team emailing payroll data to a vendor
-
6. Notifications and Overrides
-
Should users be notified?
-
Should policy tips be shown?
-
Should users be allowed to override and justify? (For high-severity events, this is often disabled.)
7. Audit and Investigation
-
Should each incident trigger admin alerts?
-
What severity level should be set for reporting and analytics?
Step-by-Step Guide: Creating a DLP Policy in Microsoft Purview
Step 1: Access the Microsoft Purview Portal
-
Navigate to: Solutions > Data loss prevention > Policies
Step 2: Create a New Policy
-
Click + Create policy
-
Choose a template based on your scenario:
-
Predefined compliance regulations (e.g., GDPR, HIPAA)
-
Custom policy for flexibility
-
Step 3: Name & Describe the Policy
-
Provide a clear name and a short description of what the policy is intended to do.
-
Tip: Include the policy intent (who it applies to, what it blocks, exceptions).
Step 4: Define Admin Scope
-
Select Admin units or apply the policy to the entire organization (default).
-
Choose Next.
Step 5: Select Locations to Monitor
-
Choose the services where the policy will be active:
-
Exchange email
-
SharePoint Online
-
OneDrive
-
Microsoft Teams
-
Devices (if endpoint DLP is configured)
-
Step 6: Define Policy Rules
-
Choose: Create or customize advanced DLP rules
-
Click Create rule
-
Configure the rule components:
A. Conditions
-
Define what triggers the rule:
-
Sensitive info types (e.g., Credit Card Number)
-
Sensitivity labels (e.g., Highly Confidential)
-
File types, file extensions, sharing context, etc.
-
B. Exceptions (Optional)
-
Add exception groups using a Boolean NOT operator
-
Example: Sender is in “Finance Team” AND recipient is “trustedvendor@domain.com”
-
C. Actions
-
Choose what to do when the condition is met:
-
Block, Restrict, or Encrypt content
-
Audit only for simulation/testing
-
D. User Notifications
-
Enable notifications to senders/editors
-
Show policy tips in apps (e.g., Outlook, Word)
E. Override Settings
-
Allow or disallow users to override the block by providing a justification
F. Incident Reporting
-
Set severity level (Low, Medium, High)
-
Enable alerts to compliance/admin teams
Step 7: Finalize and Simulate
-
Review the settings
-
Choose to run the policy in simulation mode (recommended for testing)
-
Click Submit to create the policy
Post-Creation Tips
-
Simulation Mode: Monitor effectiveness before enforcement
-
Policy Testing: Use test data to trigger the policy and confirm expected behavior
-
Policy Reports: View violations under Reports > DLP alerts
-
Fine-tune: Adjust thresholds, exceptions, and scope as needed
Example Use Cases You Can Build From
| Scenario | Example Policy Configuration |
|---|---|
| Prevent employees from emailing credit card numbers | Condition: Credit Card Info Action: Block email Notify sender and admin |
| Warn users about sharing internal-only content to external domains | Condition: Sensitivity label = Internal Action: Show policy tip Allow override |
| Restrict uploading HR documents to personal OneDrive | Condition: HR keyword or file name Location: Devices Action: Block upload to personal apps |
If you need further assistance, kindly contact our support at support@cytechint.com for prompt assistance and guidance.
No Comments