
AQUILA - Oracle Audit Logs Integration
This integration is for ingesting Audit Trail logs and fetching performance, tablespace and sysmetric metrics from Oracle Databases.
The integration expects an *.aud audit file that is generated from Oracle Databases by default. If this has been disabled, then please see the Oracle Database Audit Trail Documentation.
Requirements
Connectivity to Oracle can be facilitated in two ways either by using official Oracle libraries or by using a JDBC driver. Facilitation of the connectivity using JDBC is not supported currently with Metricbeat. Connectivity can be facilitated using Oracle libraries and the detailed steps to do the same are mentioned below.
Oracle Database Connection Pre-requisites
To get connected with the Oracle Database ORACLE_SID, ORACLE_BASE, ORACLE_HOME environment variables should be set.
For example: Let’s consider Oracle Database 21c installation using RPM manually by following the Oracle Installation instructions. Environment variables should be set as follows: ORACLE_SID=ORCLCDB ORACLE_BASE=/opt/oracle/oradata ORACLE_HOME=/opt/oracle/product/21c/dbhome_1 Also, add $ORACLE_HOME/bin to the PATH environment variable.
Oracle Instant Client
Oracle Instant Client enables development and deployment of applications that connect to Oracle Database. The Instant Client libraries provide the necessary network connectivity and advanced data features to make full use of Oracle Database. If you have OCI Oracle server which comes with these libraries pre-installed, you don't need a separate client installation.
The OCI library install few Client Shared Libraries that must be referenced on the machine where Metricbeat is installed. Please follow the Oracle Client Installation link link for OCI Instant Client set up. The OCI Instant Client is available with the Oracle Universal Installer, RPM file or ZIP file. Download links can be found at the Oracle Instant Client Download page.
If Elastic Agent is running as a systemd service and not using ldconfig is an option, to update the links to the shared libraries, you can use the LD_LIBRARY_PATH environment variable instead. Follow these steps to ensure Elastic Agent and its spawned processes respect the LD_LIBRARY_PATH environment variable.
Prerequisites: Ensure that you have administrative privileges to modify the Elastic Agent systemd service configuration.
Steps:
-
Check the status of the Elastic Agent systemd service by running the following command:
systemctl status elastic-agent.serviceTake note of the path to the elastic-agent.service file, which is typically located in the systemd service directory. Example path:/etc/systemd/system/elastic-agent.service -
Open the elastic-agent.service file in your preferred text editor, find the
EnvironmentFilekey (commonly found at/etc/sysconfig/elastic-agent), and verify its contents, as these configurations are essential for the elastic-agent's runtime environment initialization. If the EnvironmentFile is absent, create it and set the necessary permissions to ensure the elastic-agent has full access. -
Add the LD_LIBRARY_PATH environment variable to the configured
EnvironmentFile. You can set it to the directory where libraries (libclntsh.so) are located. For example, if your libraries are in the/opt/oracle/instantclient_21_1 directory, add the following line to theEnvironmentFile(i.e./etc/systemd/system/elastic-agent.service)LD_LIBRARY_PATH=/opt/oracle/instantclient_21_1 -
Save the changes made to the configured
EnvironmentFile. -
Restart the Elastic Agent systemd service to apply the changes by running the following command:
systemctl restart elastic-agent.serviceEnsure that you replace
/opt/oracle/instantclient_21_1with the actual path to the directory where the required libraries (libclntsh.so) are located. This will set the library search path for the Elastic Agent service to include the specified directory, allowing it to locate the required libraries.* Please take note of the Path since we will need it later for the integration part.
Enable Listener
The Oracle listener is a service that runs on the database host and receives requests from Oracle clients. Make sure that Listener is be running. To check if the listener is running or not, run:
lsnrctl STATUS
If the listener is not running, use the command to start:
lsnrctl START
Then, Metricbeat can be launched.
Oracle DSN Configuration
The following two configuration formats are supported:
oracle://<user>:<password>@<connection_string>
user="<user>" password="<password>" connectString="<connection_string>" sysdba=<true|false>
Example values are:
oracle://sys:Oradoc_db1@0.0.0.0:1521/ORCLCDB.localdomain?sysdba=1
user="sys" password="Oradoc_db1" connectString="0.0.0.0:1521/ORCLCDB.localdomain" sysdba=true
In the first, URL-based format, special characters should be URL encoded.
In the seoncd, logfmt-encoded DSN format, if the password contains a backslash character (\), it must be escaped with another backslash. For example, if the password is my\_password, it must be written as my\\_password.
To mask the password shown in the DSN, remove the username and password from the DSN string, and configure the DSN to only include the host address and any additional parameters required for the connection. Subsequently, we can use the username and password fields under advanced options in the backend to configure them.
* Please take note of the Oracle DSN since we will need it later for the integration part.
Integration on AQUILA
-
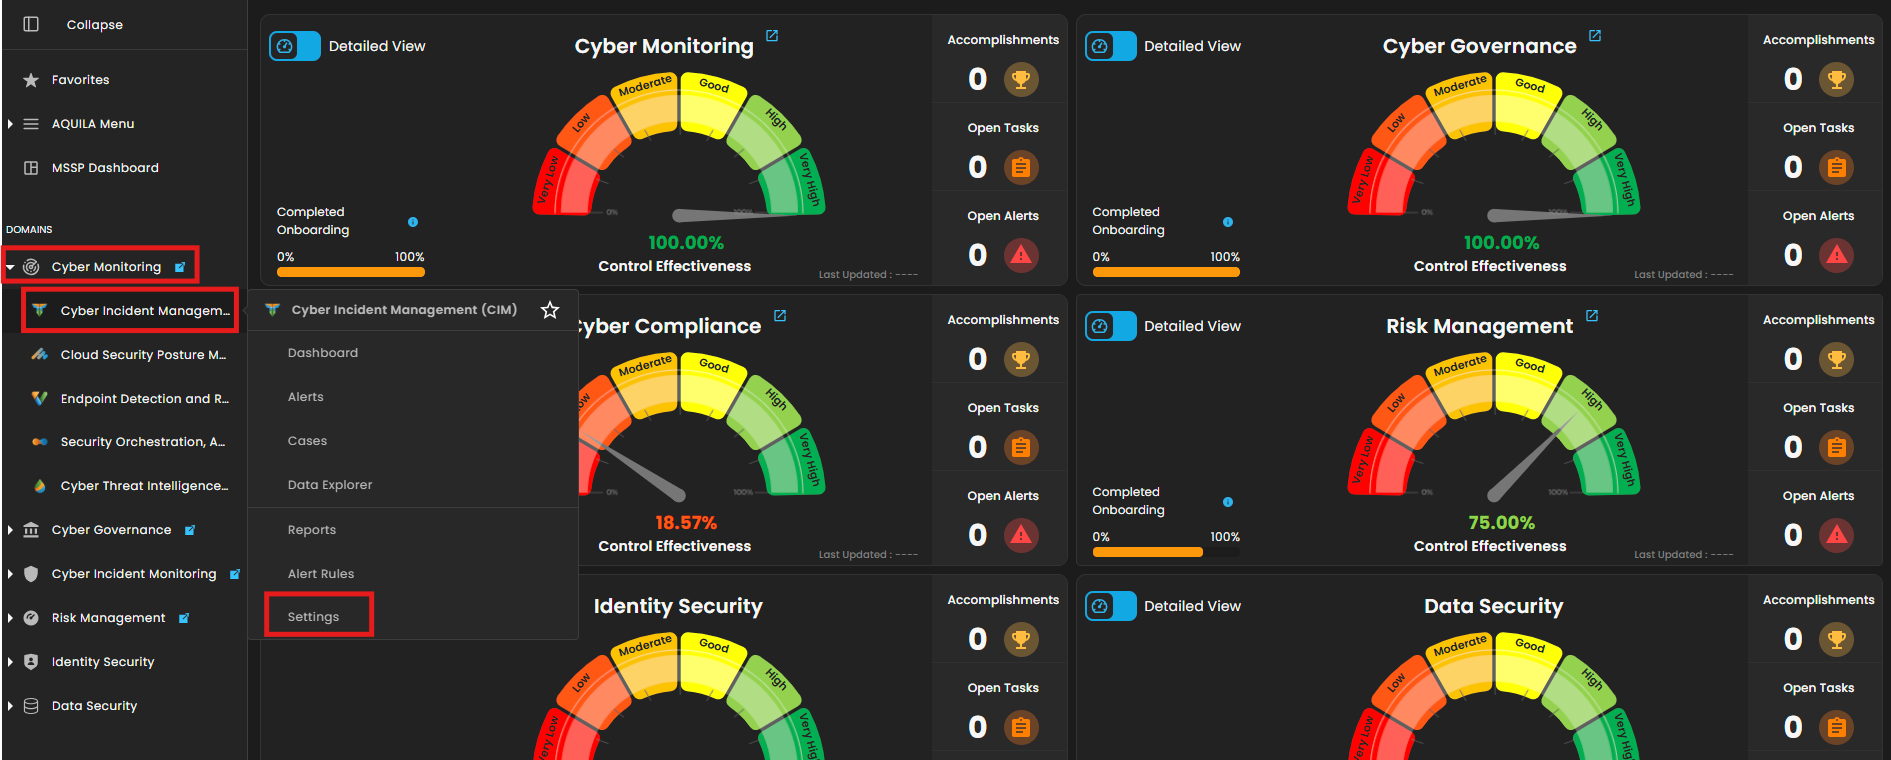
Login to AQUILA. Go to Cyber Monitoring -> Cyber Incident Management (CIM) -> Settings.
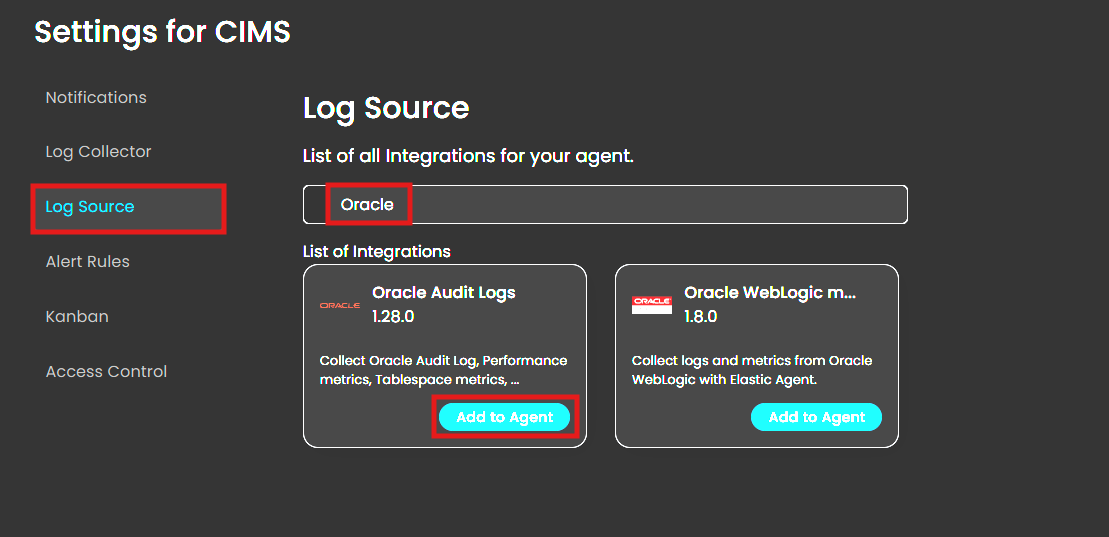
2. Choose Log Source. Type "Oracle" on the text field then choose the first shown on List of Integrations and click Add to Agent.
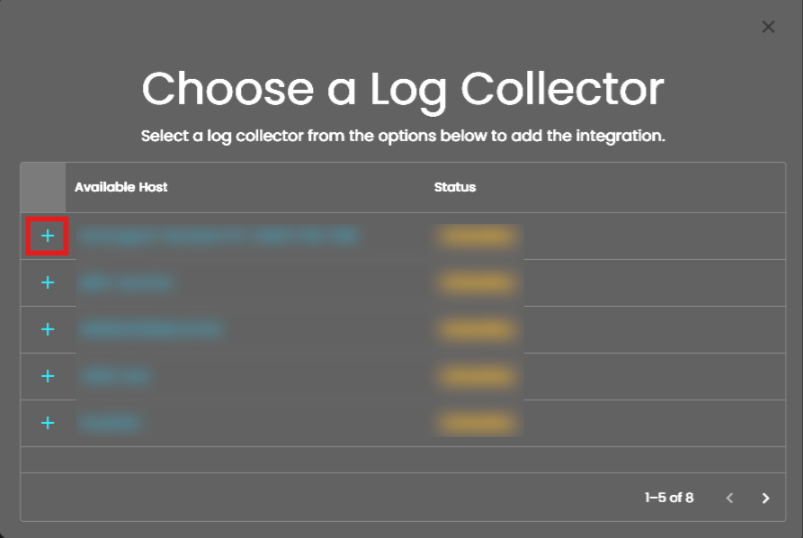
3. Choose what Log Collector you want to integrate the Log Source.
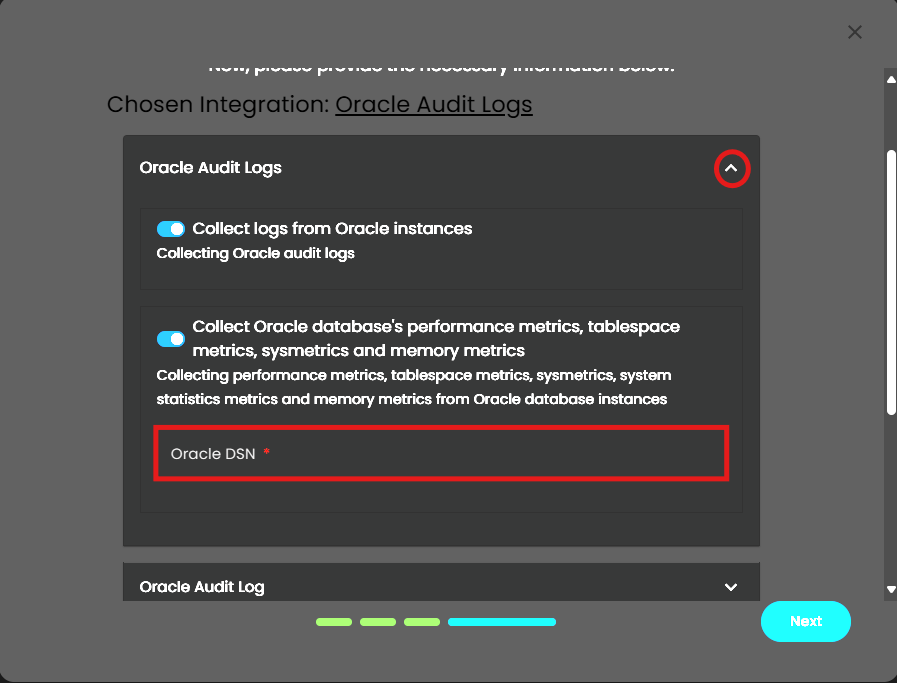
4. Click the drop-down arrow on Oracle Audit Logs. On the Oracle DSN textbox input the details you gathered earlier.
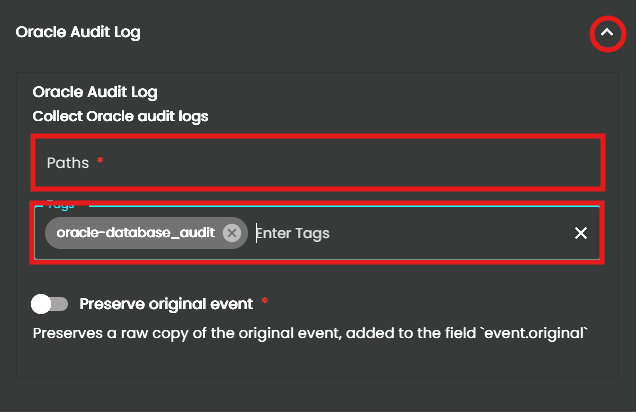
5. Scroll down and click the drop-down arrow on Oracle Audit Log. In the Paths textbox input the data you gathered earlier. In the Tags textbox, click the textbox and it will show 1 value choose that.
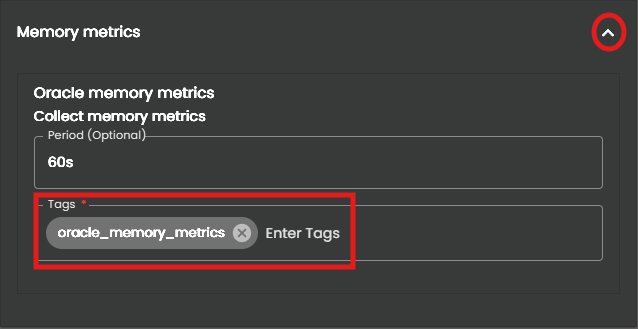
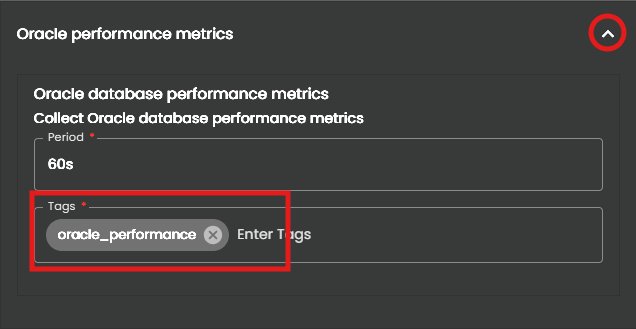
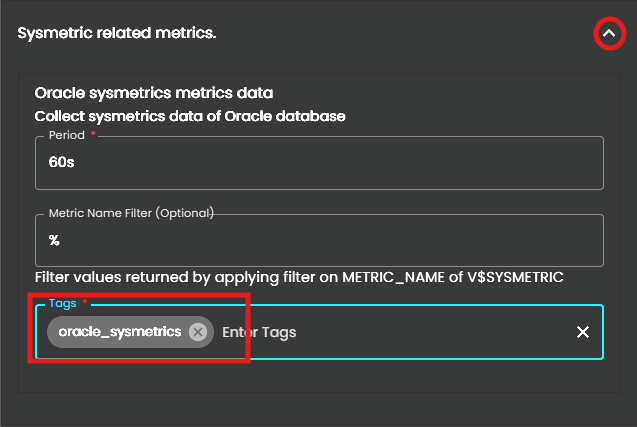
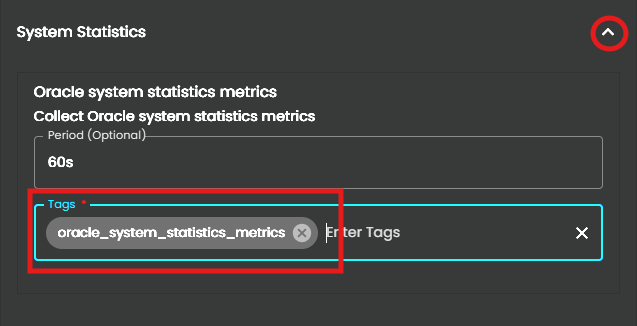
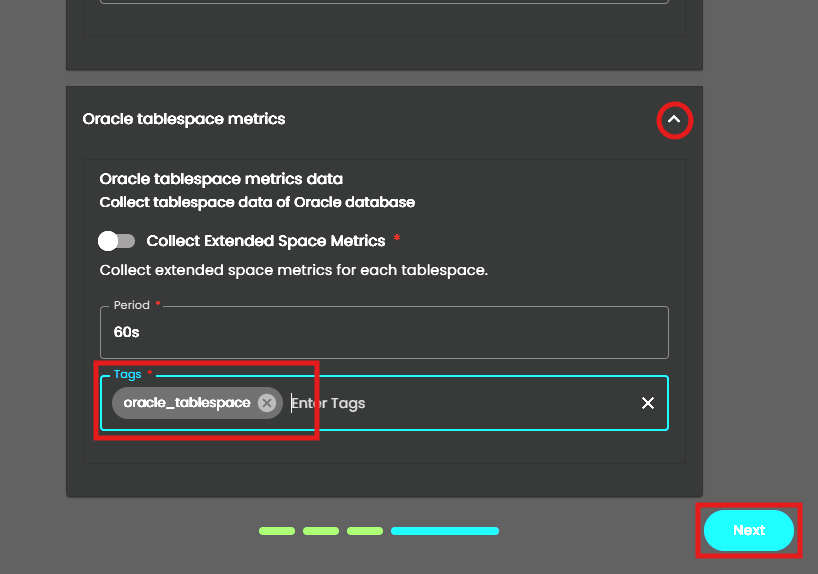
6. For Memory metrics, Oracle performance metrics, Sysmetric related metrics, System Statistics and Oracle tablespace metrics just click all the Tags textbox on them and choose the only value shown. After that click next.
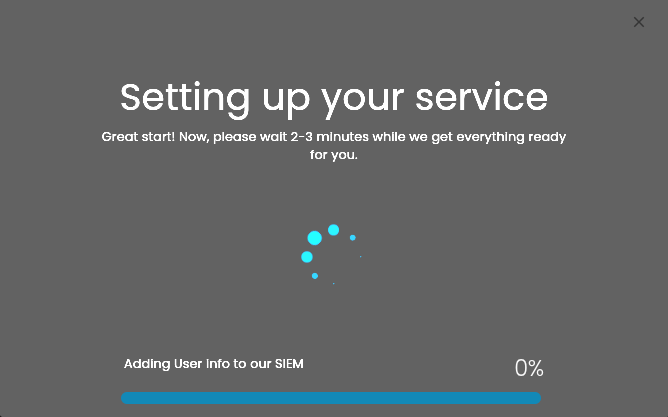
7. Wait for the Successful window to display, this will confirm the successful integration.
If you need further assistance, kindly contact our support at support@cytechint.com for prompt assistance and guidance.
No Comments