AQUILA EDR Deployment via GPO on Windows Server AD
This document provides a step-by-step guide for deploying AQUILA Endpoint Detection and Response (EDR) on Windows Server environments using Group Policy Objects (GPO). The purpose of this guide is to streamline the installation process, ensure consistent configuration across domain-joined systems, and simplify centralized management of the EDR agent. By leveraging Group Policy, administrators can enforce deployment at scale, reduce manual installation efforts, and maintain stronger security coverage across the organization’s Windows Server infrastructure.
Scope & Audience
This guide is intended for system administrators, IT operations teams, and security engineers responsible for managing Windows Server environments within an Active Directory domain. The deployment process outlined here applies to Windows Server editions that support Group Policy and assumes administrative privileges within the domain.
The scope of this document covers:
-
Preparing the Windows Server environment for AQUILA EDR deployment
-
Configuring and applying Group Policy Objects (GPO) for automated agent installation
-
Ensuring consistent and secure deployment across domain-joined systems
This document does not cover post-deployment tasks such as advanced policy tuning, threat hunting, or incident response workflows.
Prerequisites
Before beginning the deployment of AQUILA EDR via Group Policy, ensure the following requirements are met:
- Administrative Permissions
- Domain Administrator or delegated privileges to create and manage Group Policy Objects (GPOs).
- Local Administrator rights on the Windows Server hosting the installer.
- Windows Server Environment
- Active Directory domain configured and operational.
- Supported Windows Server editions (2016, 2019, 2022).
- Network connectivity between domain controllers and target machines.
- AQUILA EDR Installer Package
- Latest version of the AQUILA EDR MSI installer obtained
- Installer stored in a shared network location (UNC path) accessible to all domain-joined endpoints.
- Group Policy Management Tools
- Group Policy Management Console (GPMC) installed on the Windows Server or administrator workstation.
- Security & Firewall Considerations
- Ensure that outbound communication to AQUILA EDR cloud services is allowed.
- Verify no local security policies block software installation.
- Testing Environment
- At least one test machine joined to the domain to validate deployment before organization-wide rollout.
Creating a UNC Path for the AQUILA EDR Installer
To ensure domain-joined computers can access the AQUILA EDR installation package, create a shared network folder and configure appropriate permissions.
- Create a Software Share Folder
- On a file server, create a folder (e.g.,
C:\SoftwareShare). - Copy the
Aquila Agent.msiinstaller into this folder.
- On a file server, create a folder (e.g.,
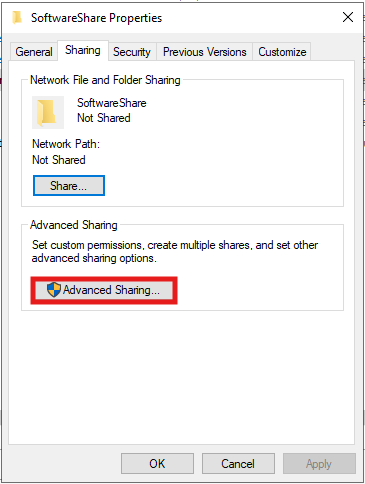
- Enable Folder Sharing
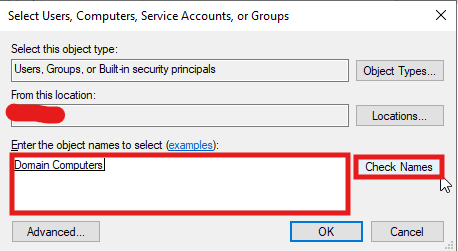
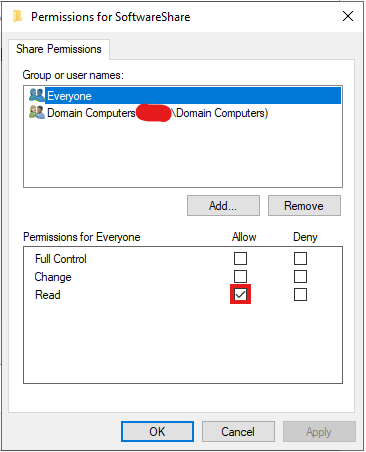
- Set Permissions
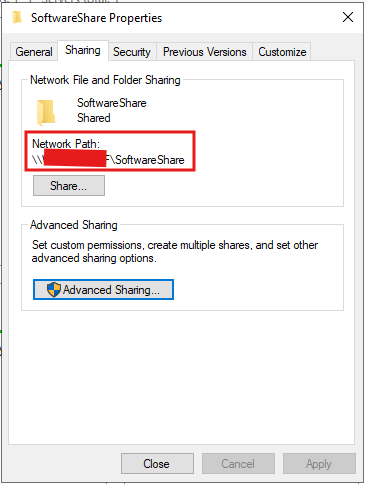
- Save the Network Path
Deploying AQUILA EDR via Group Policy
Use Group Policy Management to create and link a Group Policy Object (GPO) that deploys the AQUILA EDR agent to domain-joined computers.
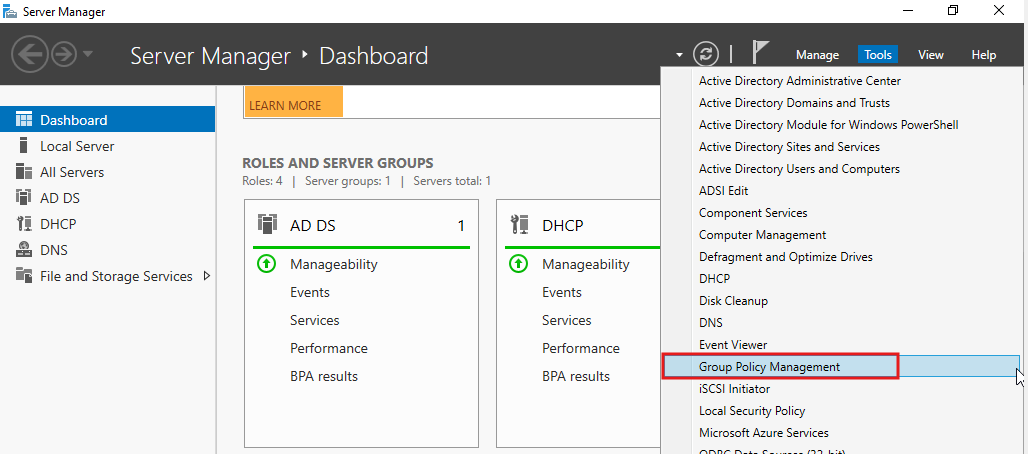
- Open Group Policy Management
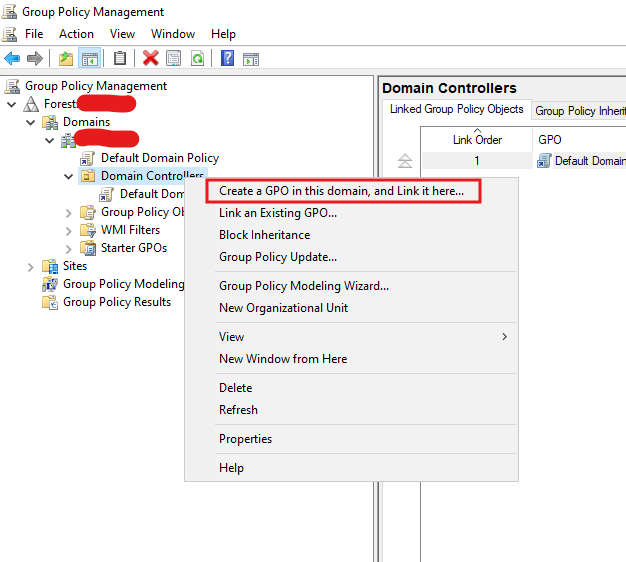
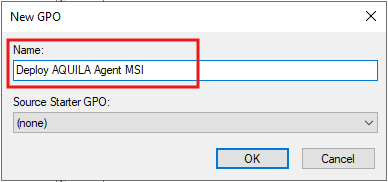
- Create a New GPO
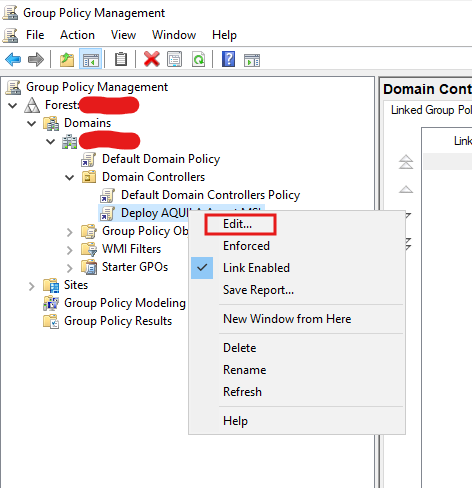
- Edit the GPO
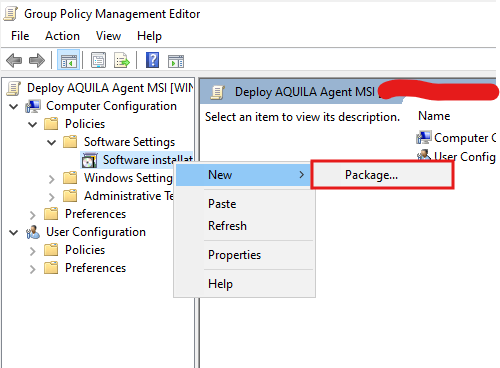
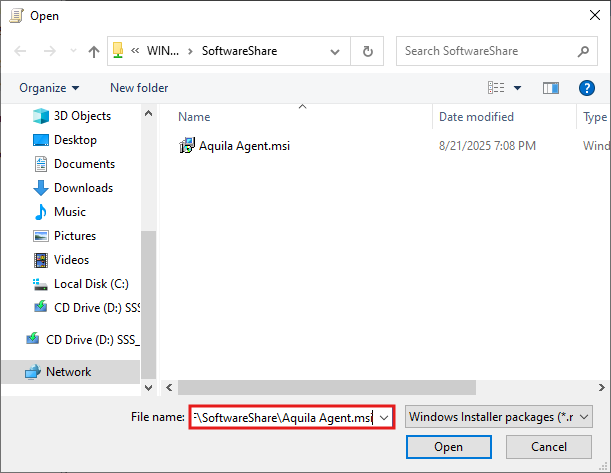
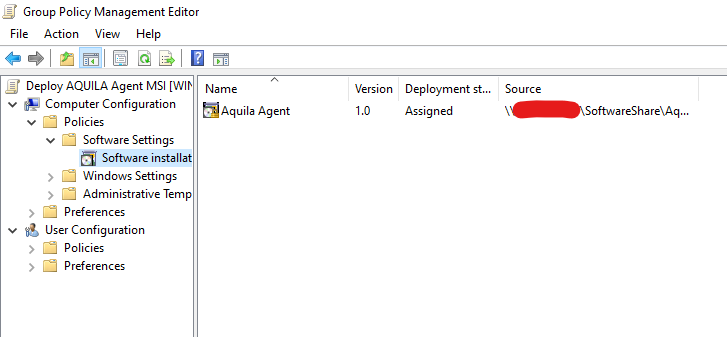
- Add the MSI Package
- Finalize the GPO
- Close the Group Policy Management Editor.
- Apply the Policy
- Open Command Prompt as Administrator.
- Run the command:
gpupdate /force - Running it here refreshes the Group Policy on the server itself.
- Verify Installation
- Reboot the domain-joined computer, the AQUILA EDR agent should install automatically during startup.
- Confirm the agent appears in the Programs and Features list or within the AQUILA EDR management console.
Troubleshooting Tips
If the AQUILA EDR agent does not install as expected after deploying the GPO, consider the following checks:
- Verify UNC Path Accessibility
- Ensure the network share (e.g.,
\\ServerName\SoftwareShare\Aquila Agent.msi) is accessible from target machines. - Confirm that
Domain Computershave Read permissions on the shared folder.
- Ensure the network share (e.g.,
- Check GPO Application
- Run
gpresult /ron a target machine to confirm the deployment GPO is applied. - Verify that the GPO is linked to the correct Organizational Unit (OU) containing the target computers.
- Run
- Confirm MSI Installer Integrity
- Test the
Aquila Agent.msifile by manually installing it on a test machine. - Re-download the installer if the package is corrupted.
- Test the
- Ensure Policy Refresh
- Run
gpupdate /forceon the client machine. - Restart the computer to trigger software installation.
- Run
- Check Event Viewer Logs
- Open Event Viewer → Windows Logs → Application.
- Look for Group Policy or MSI installation errors (Event IDs 103, 104, 108).
- Review Software Installation Settings
- Confirm that the package was added under Computer Configuration → Policies → Software Settings → Software Installation (not under User Configuration).
- Ensure the package was configured as Assigned, not Published.
- Firewall or Security Software Conflicts
- Verify that local security software is not blocking MSI execution.
- Ensure firewall rules allow communication to AQUILA EDR services.
If you need further assistance, kindly contact our support at support@cytechint.com for prompt assistance and guidance.

No Comments