
AQUILA - Salesforce Integration
Overview
The Salesforce integration enables you to monitor your Salesforce instance. Salesforce is a customer relationship management (CRM) platform that supports businesses in managing marketing, sales, commerce, service, and IT teams from a unified platform accessible from anywhere.
Data Streams Logs
- Salesforce Apex Logs
- Salesforce Login Logs
- Salesforce Logout Logs
- Salesforce SetupAudit Logs
Configuration
To configure the Salesforce integration, you need the following information:
-
Salesforce instance URL
-
Client key and client secret for authentication
-
Username
-
Password
-
Token URL
-
API version
Step 1: Salesforce instance URL
This is the URL of your Salesforce Organization.
-
Salesforce Classic: Given the example URL https://na9.salesforce.com/home/home.jsp, the Salesforce Instance URL is extracted as https://na9.salesforce.com.
-
Salesforce Lightning: The instance URL is available under your user name in the View Profile tab. Use the correct instance URL in case of Salesforce Lightning because it uses *.lightning.force.com but the instance URL is *.salesforce.com.
Ensure the Instance URL is noted, as it will be used in both API creation and integration steps.
Step 2: Client Key and Client Secret for Authentication
To use this integration, you need to create a new Salesforce Application using OAuth. Follow these steps to create a connected application in Salesforce:
-
Log in to Salesforce with the user credentials you want to collect data with.
-
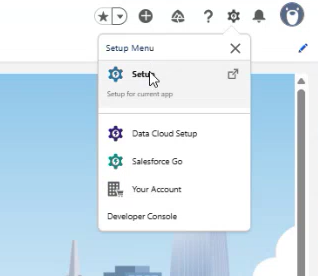
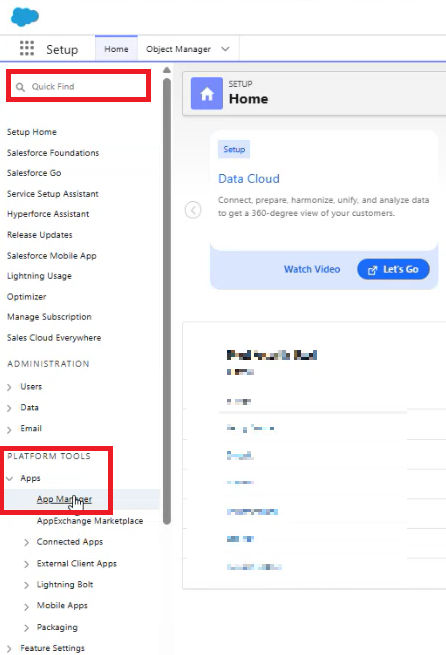
Click Setup in the top right menu bar.
-
In the Quick Find textbox, search for App Manager or you can scroll down to PLATFORM TOOLS and select App Manager.
-
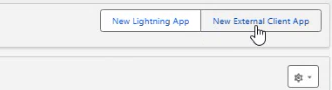
In the upper right corner, choose the New External Client App.
-
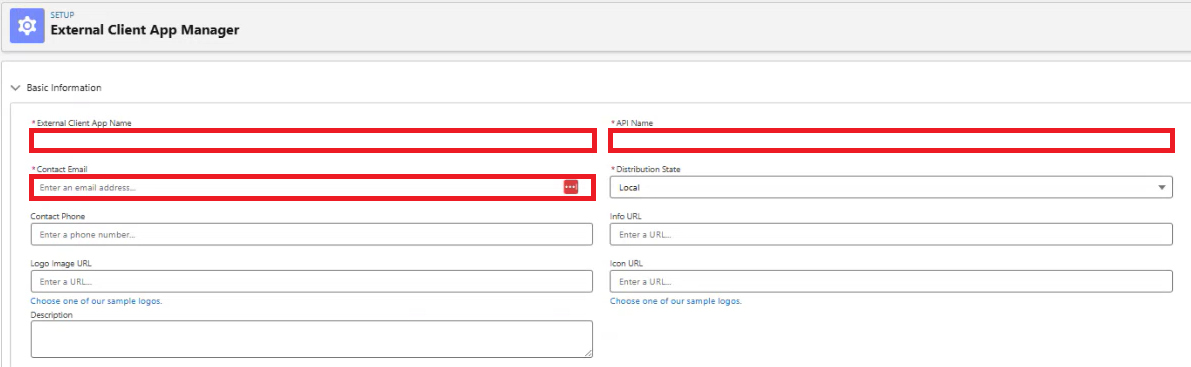
Provide a name for the connected application. This name will be displayed in the App Manager and on its App Launcher tile.
-
Enter the API name. The default is a version of the name without spaces. Only letters, numbers, and underscores are allowed. If the original app name contains any other characters, edit the default name.
-
Enter the contact email for Salesforce.
-
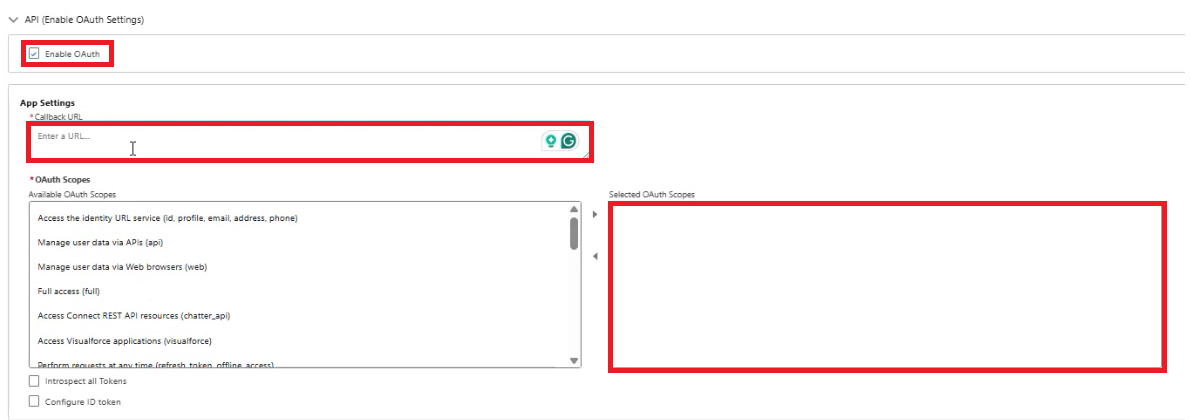
Under the API (Enable OAuth Settings) section, check the box for Enable OAuth Settings.
-
In the Callback URL field, enter the instance URL as specified in Salesforce instance URL. Example URL: https://na9.salesforce.com
-
Select the following OAuth scopes to apply to the connected app:
-
Manage user data via APIs (api)
-
Perform requests at any time (refresh_token, offline_access)
-
(Optional) If you encounter any permission issues during data collection, add the Full access (full) scope.
-
-
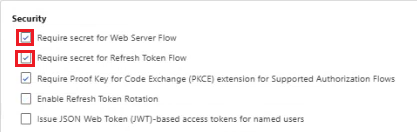
Select Require Secret for the Web Server Flow to require the app's client secret in exchange for an access token.
-
Select Require Secret for Refresh Token Flow to require the app's client secret in the authorization request of a refresh token and hybrid refresh token flow.
-
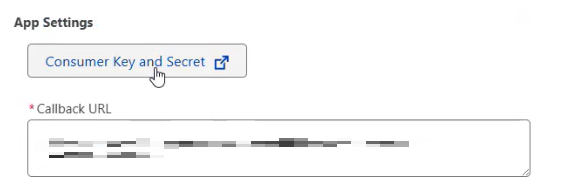
Then scroll up above the Callback URL on the App Settings you will see the Consumer Key and Secret button, click it.
-
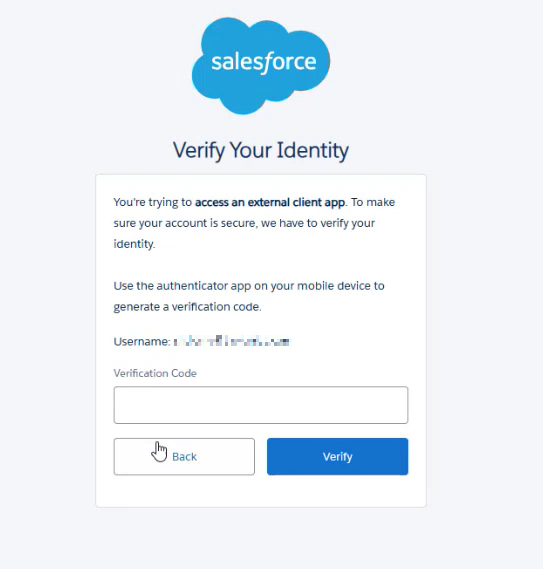
It will create another tab. Verify the user account by entering the Verification Code.
-
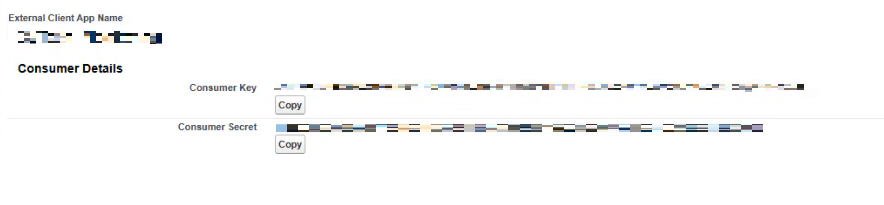
Copy the
Consumer KeyandConsumer Secretfrom the Consumer Details section. These values should be used as the Client ID and Client Secret, respectively, in the integration.
-
Close that tab and go back to the External Client App Manager. Click Save.
Step 3: Username
The User ID of the registered user.
Step 4:Password
The password used to authenticate the user with your Salesforce instance.
Note:
When using a Salesforce instance with a security token, append the token directly to your password without spaces or special characters. For example, if your password is Password and your security token is 12345 enter: Pasword12345
Step 5: Token URL
-
Use the token URL to obtain authentication tokens for API access.
-
For most Salesforce instances, the token URL follows this format: https://login.salesforce.com/services/oauth2/token.
-
If you're using a Salesforce sandbox environment, use https://test.salesforce.com/services/oauth2/token instead.
-
For custom Salesforce domains, replace login.salesforce.com with your custom domain name. For example, if your custom domain is mycompany.my.salesforce.com, the token URL becomes https://mycompany.my.salesforce.com/services/oauth2/token. This applies to Sandbox environments as well.
-
In the Salesforce integration, we internally append /services/oauth2/token to the URL. Make sure that the URL you provide in the Salesforce integration is the base URL without the /services/oauth2/token part. For example, if your custom domain is mycompany.my.salesforce.com, the complete token URL would be https://mycompany.my.salesforce.com/services/oauth2/token, but the URL you provide in the Salesforce integration should be https://mycompany.my.salesforce.com. In most cases, this is the same as the Salesforce instance URL.
NOTE: Salesforce Lightning users must use URL with *.salesforce.com domain (similar to the Salesforce instance URL) instead of *.lightning.force.com because the Salesforce API does not work with *.lightning.force.com.
Step 6: API Version
To find the API version:
-
Go to the search textbox and type Api Version. Click the first Api Version on the list.
Reference: https://www.integrate.io/blog/salesforce-rest-api-integration/
Please provide these credentials and send it to CyTech Support:
-
Salesforce instance URL
-
Client key and client secret for authentication
-
Username
-
Password
-
Token URL
-
API version
If you need further assistance, kindly contact our support at support@cytechint.com for prompt assistance and guidance.