Log Collector Installation - Windows Automatic
Log Collector Installation in CyTech - Aquila
This guide outlines the step-by-step process for deploying the Elastic Agent as a log collector within the CyTech - Aquila environment. Following these instructions will establish a secure and automated mechanism for log collection and management, enabling centralized visibility and analysis critical to cybersecurity operations.
Pre-requisites
- Access to CyTech - Aquila
-
Only users assigned the "Owner" or "Admin" role can access the Log Collector installation resources within the platform.
-
- Dedicated Virtual Machine for Log Collector Deployment
-
Dedicated Unit: It is recommended to use a separate, dedicated VM exclusively for the Log Collector to prevent resource contention and ensure stable performance.
-
Virtual Machine (VM) Preferred: Deploying the Log Collector on a VM offers greater flexibility, scalability, and easier maintenance compared to physical hardware.
- Always Online: The virtual machine must remain continuously online to ensure uninterrupted log collection from all integrated sources.
-
For the full Log Collector Hardware Requirements Guide, please refer to this link: Log Collector Hardware Requirements Guide
Steps to Add Log Collector
Please follow the steps below to add a Log Collector using Windows Environment.
1. Log in to AQUILA click here - CyTech - AQUILA. Choose Cyber Monitoring and click the small arrow icon to redirect you to the Cyber Monitoring Dashboard.
2. In the dashboard, choose Cyber Incident Management (SIEM and XDR).
You can also refer to our documentation manuals for Log Collector Installations Guidelines: https://docs.cytechint.io/books/log-collector-installations
5. From the options, select the 'Automatic' installation option. Then click 'Next'.
6a. Download the Windows Installer.
- Click on the "Download Installer" button to download the Windows MSI Package for Elastic Agent.
- The URL can also be found on https://artifacts.elastic.co/downloads/beats/elastic-agent/elastic-agent-8.15.1-windows-x86_64.msi
6b. Ensure that the Elastic Agent file is located in your Downloads folder before proceeding.
6c. Copy the commands provided on the installation page and execute them sequentially to ensure successful execution. These commands are required to complete the log collector installation in the subsequent steps.
7. In your dedicated environment for your Log Collector, open the Command Prompt and run as Administrator.
- For example (elastic-agent-<VERSION>-windows-x86_64.msi INSTALLARGS="--url=<URL> --enrollment-token=<TOKEN>").
- Once the commands are executed successfully, you should see an output similar to the example shown in the image below.
8a. The Elastic Agent installation window will appear. Check the “I accept the terms in the license agreement” box, then click Install.
Wait for the installation to complete, and then click Finish.
9. Before proceeding with the final installation setup, ensure all required steps have been completed by clicking the check box. Once confirmed, click “Next” to continue.
10. Allow 3–5 minutes for the Log Collector Agent to complete registration and report its "Online" status to the fleet server, indicating a successful installation.
11. This step confirms the successful installation and enrollment of the Log Collector Agent with the fleet server. The interface will display the Log Collector host name and the user who performed the installation. Click "Continue" to complete the setup process.
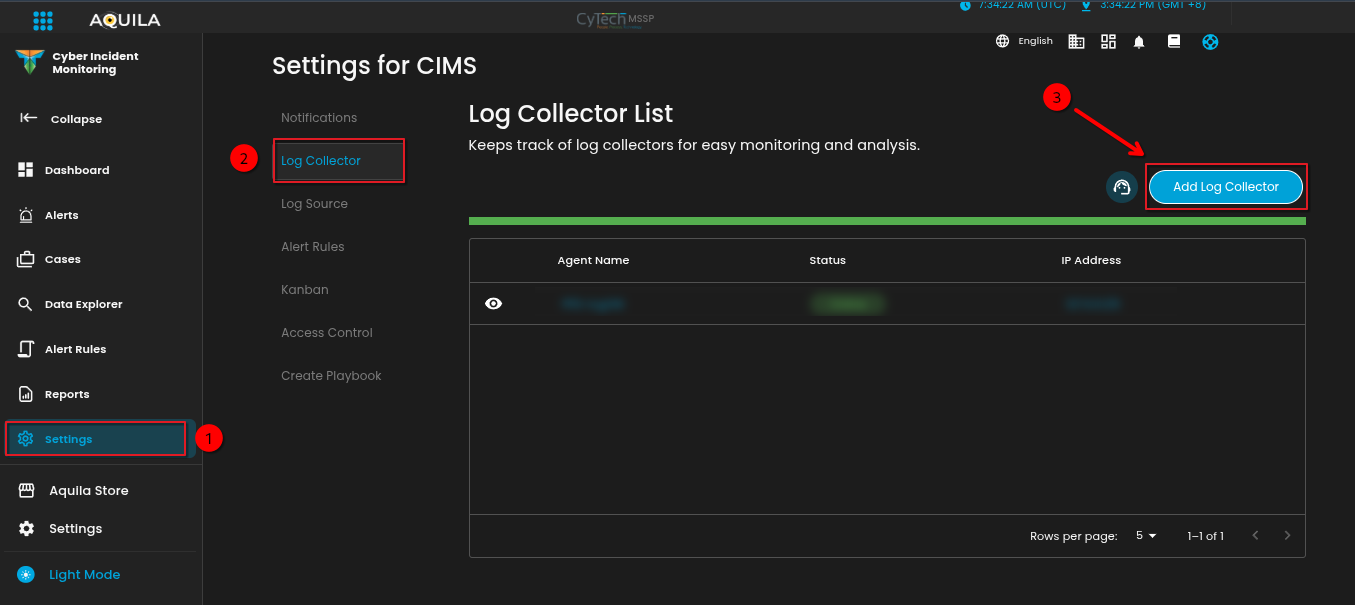
12. Also you can verify successful installation by going to Cyber Incident Monitoring>Settings>Log Collector.
- In the Log Collector List, you can see all the log collector installed. You can also view the Log Collector details such us: Agent Name, Status and IP address.
***If you encounter Log Collector Setup Failed. Please click "Retry" and carefully go gack to Steps 5 or 6. You can also try "Manual" installation. If issues persist please contact our technical support at support@cytechint.com for prompt assistance and guidance.
If you need further assistance, kindly contact our technical support at support@cytechint.com for prompt assistance and guidance.


No Comments