Culture and Awareness
This section describes the modules that promote strong culture and heightened awareness that can significantly reduce the risk of cyber incidents by ensuring that everyone in the organization understands their role in maintaining security.
- Phishing Simulation Manual
- Whitelisting
- Whitelist in CISCO Secure Email Gateway
- Whitelist in AppRiver
- Whitelist for Harmony Email & Collaboration in Microsoft 365 and Google Workspace
- Whitelist in Barracuda
- Whitelisting in EdgeWave
- Creating an allowed senders filter list for Forefront Protection for Exchange
- Whitelist in Fortinet FortiGate
- Whitelist in McAfee or MX Logic
- Whitelist in Mimecast
- Whitelist in Proofpoint
- Whitelist in SonicWall
- Whitelist in Sophos
- Whitelist in SpamAssassin
- Whitelist in MessageLabs or Symantec.cloud
- Whitelist in Trend Micro
- Whitelist in VIPRE
- Whitelist in Google Workspace
Phishing Simulation Manual
Overview
Welcome to the Phishing Simulation module. In this section, you'll be guided through the process of using our Phishing Simulation tool. You'll learn how to:
Navigate to the module:

- Under Cyber Assesment, click on Phishing Simulations

Phishing Simulation Dashboard:
- The dashboard provides a comprehensive view of phishing simulation campaigns, helping organizations monitor and analyze their effectiveness. It tracks key metrics such as the number of active campaigns, start and end dates, and recipient engagement, including how many recipients opened the email, clicked on links, or were compromised. The dashboard features visual tools like charts and graphs to represent these metrics, making it easier to assess overall campaign performance and identify trends over time. Detailed and summary reports offer insights into individual and collective recipient behavior, enabling organizations to gauge the impact of their phishing simulations, improve security awareness, and tailor additional training efforts. This tool is essential for evaluating the effectiveness of security training programs and enhancing overall organizational security.

- On the right-hand side of the phishing simulation dashboard, key metrics provide a snapshot of the organization’s phishing simulation efforts. This section displays the total number of users within the organization, offering insight into the scope of the simulations. It also shows the total number of phishing simulations executed, tracking the volume of tests conducted. Additionally, the dashboard presents open rates, which reflect the percentage of users who opened the phishing emails, and click rates, indicating the percentage of users who clicked on links within those emails. These metrics collectively help assess the effectiveness of the phishing simulations, gauge user engagement, and evaluate the impact of security awareness initiatives.

- The top 10 Highest risk recipients shows the top users in an organization that is more likely to be susceptible to phishing attacks based on their interactions with the simulation emails. It typically includes metrics such as the number of emails opened, the frequency of clicks on malicious links, and instances of compromised actions. By focusing on these high-risk individuals, organizations can tailor targeted training and support to improve their security awareness and reduce their vulnerability to real phishing attacks. This feature allows security teams to prioritize their efforts and address potential weaknesses in their organization's defenses more effectively.

Simulations Campaign Dashboard:
The dashboard offers a detailed overview of phishing simulation campaigns, showcasing critical information about each campaign's status and performance. It indicates whether a campaign is active and provides the start and end dates. The dashboard also tracks recipient engagement, displaying counts of those who have not opened, opened, visited, or been compromised by the simulations, allowing for effective monitoring and impact assessment.
Additionally, a chart visualizes the percentage of recipients who opened, visited, or were compromised, relative to the total number of simulations conducted. This visualization helps you quickly grasp the effectiveness of your phishing campaigns and their overall impact.

- To view more details about a specific campaign, click on a specific campaign.

- This section provides an in-depth view of a specific phishing simulation campaign, offering detailed insights into the participants and the campaign's outcomes. It includes a list of all recipients involved, complete with their respective details.

- Additionally, it features information about the email template used in the campaign, along with a preview of how the email appeared to the recipients.

- The results of the campaign are displayed in this modal view, including a comprehensive summary of recipient interactions. A graph visualizes key statistics, showing the number of users who opened the phishing email, visited the links, were compromised, or did not open the email. This detailed overview allows for a thorough analysis of the campaign's effectiveness and recipient engagement.

Recipients Dashboard:
The recipients dashboard shows all the recipients of an organization that will be monitored during phishing simulations. It shows information such as their full name, status, email address, department in the organization, as well as the click prone percentage. The click prone percentage shows how likely they are to click on phishing emails when simulations are being conducted.

Add Domain:
- You must add the domains before adding recipients to the list. This ensures that the specified domains are authorized to receive phishing simulations.


Add Recipients:
- Click on the add recipient button to add recipients

- A modal is then shown with options such as manual entry or import CSV.

- Manual Entry - Manually enter a recipient's individual details. Perfect for adding only a small number of recipients.

- Import CSV - A CSV file can be uploaded to add multiple recipients all at once. The file must follow the required format for ease of transport process. Perfect for a large number of recipients.

- Once the information is filled out, click submit or finish and a new recipient has been added to the phishing simulation module.
Create a Phishing Campaign:
- To start, click on the simulations icon.

- Then click on create a campaign.

- From here you can choose any email templates to run the phishing simulations, or create a new email template.

- From here you can choose any landing page template, or create a new landing template.

- Then fill in the information needed to be placed on the phishing simulation campaign. These information are used as the phishing simulation's sender details.

- Then choose the recipients you want to partake in the phishing campaign and check there status whether they'll open, click, or ignore the phishing email.

- Then you click on any of the options to launch the phishing simulation campaign to the target recipients.
-
Launch Now – Sends the campaign immediately to all recipients under the module (not just the selected ones).
-
Launch Now to Selected Recipients – Sends immediately to only the recipients you've selected.
-
Schedule Sending for Selected Recipients – Allows you to schedule the date and time for sending, and specify how many hours the emails should be spread over.
-

If you need further assistance, kindly contact our support at support@cytechint.com for prompt assistance and guidance.
Whitelisting
Whitelist in CISCO Secure Email Gateway
If you're using Cisco Secure Email Gateway spam filtering, you can whitelist CyTech to allow our simulated phishing test emails and training notifications through to your end users.
The instructions below include information from the Cisco whitelisting article. If you run into issues whitelisting CyTech in Cisco Secure Email Gateway, we recommend reaching out to Cisco for specific instructions. You can also contact our support team whenever you need assistance.
Whitelisting Cisco Secure Email Gateway
To whitelist CyTech in Cisco Secure Email Gateway, do the following:
- From the Cisco Secure Email Gateway admin console, navigate to the Incoming Mail Policies tab.

- Select HAT Overview. Please ensure that InboundMail lister is selected.
- Click WHITELIST. If you do not see WHITELIST, you can create your own group named "WHITELIST".
- Click Add Sender and add our domains. Note: Contact CyTech for the list of domain names.
- Click Submit and then Commit Changes.

Disable Spam Scanning
To disable spam scanning in Cisco Secure Email Gateway, do the following:
- From the Cisco Secure Email Gateway admin console, navigate to the Incoming Mail Policies tab.
- Click WHITELIST. If you do not see WHITELIST, you can create your own group named "WHITELIST".
- Disable Spam Scanning for the whitelisted


Skipping Outbreak Filter Scanning
The instructions above for whitelisting Cisco Secure Email Gateway do not prevent Secure Email Gateway's Outbreak Filter from scanning emails from our IPs or domain names. If you are experiencing issues with our emails being quarantined, you may also need to set our IPs or hostnames to bypass this filter.
To skip Outbreak Filter Scanning, do the following:
- From your Cisco Secure Email Gateway admin console, navigate to the Incoming Mail Policies tab.
- Under the Message Modification section, enter our IP addresses or domain names in the Bypass Domain Scanning table. Note: Contact CyTech for the list of IPs or domain names.
- Click Submit and then Commit Changes.
Troubleshooting
If Cisco Secure Email Gateway is flagging CyTech's simulating phishing emails as spam or removing attachments from these emails, you may need to troubleshoot further in Cisco Secure Email Gateway.
For a potential troubleshooting method, see the steps below. If you don't see the solution you're looking for, we recommend reaching out to Cisco Ironport for assistance.
- Create an individual HAT Mail Flow Policy specifically for CyTech.
- In this policy, disable Spam Detection and Virus Protection. For more information, see Cisco Ironport's Mail Flow Policy documentation.
- Add a sender group for our IP addresses or hostnames. Note: Contact CyTech for the list of IPs or hostnames.
- Apply the policy to the sender group. For more information, see Cisco Ironport's Message Handing documentation.
If you need further assistance, kindly contact our support at support@cytechint.com for prompt assistance and guidance.
Whitelist in AppRiver
If you're utilizing AppRiver's SpamLab spam filtering, you can whitelist CyTech to allow our simulated phishing test emails and training notifications through to your end users.
The instructions below are for a third-party software. For more information on this process, see Zix's How do I limit Inbound SMTP Traffic to servers article. If you run into issues whitelisting CyTech in AppRiver, we recommend reaching out to AppRiver for specific instructions. You can also contact our support team whenever you need assistance.
Setup
Below are steps you should follow:
- First, log onto the AppRiver Admin Center.
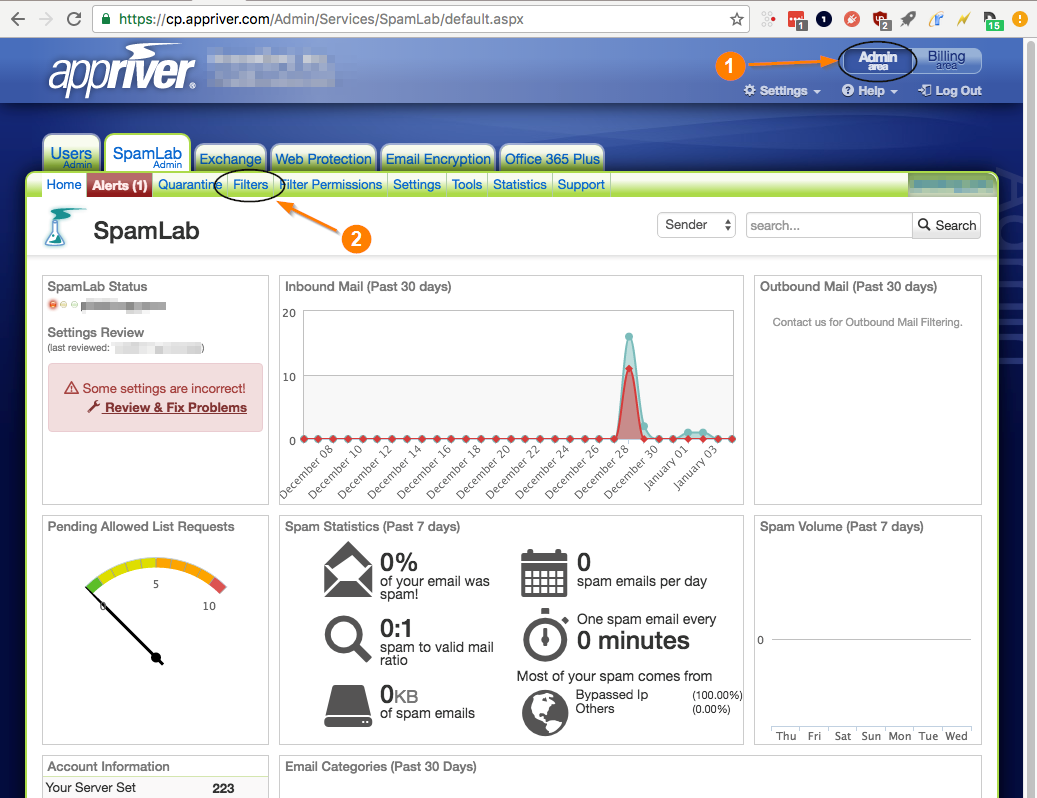
- Select Filters --> IP Addresses
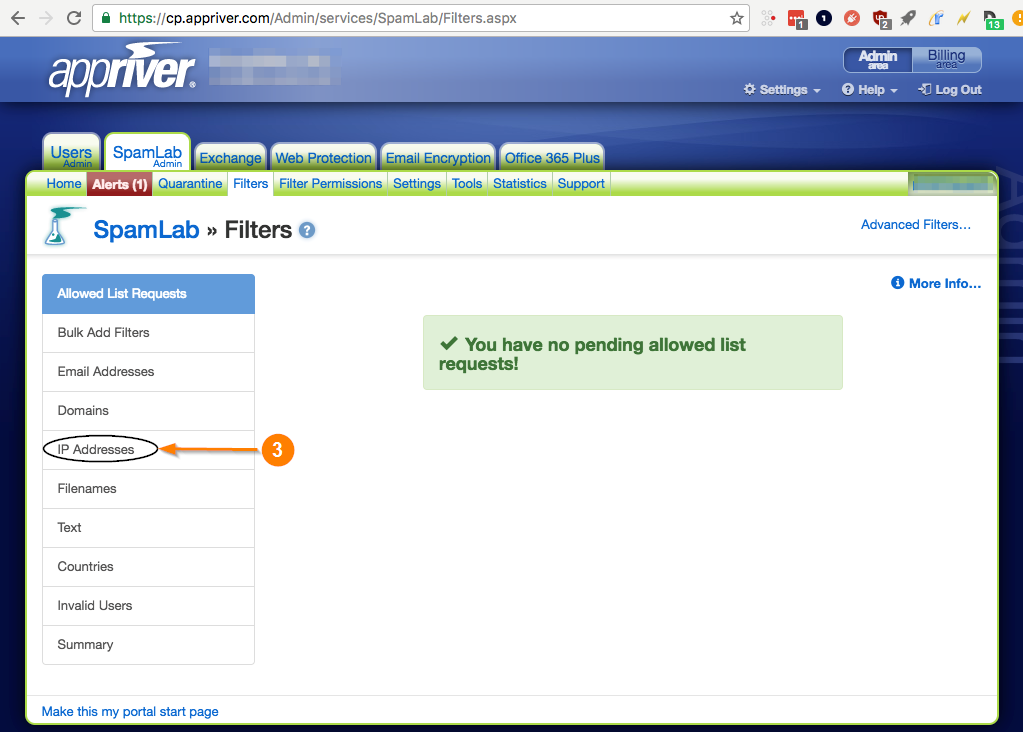
- Under Allowed IP Addresses, add our IP addresses. Note: Contact CyTech for a list of IPs or hostname.
Note: Allowing an IP address will make each message originating from it to bypass all filtering checks except for virus filtering.

Finally, click Save.
Note: After following this article, we recommend setting up a test phishing campaign to 1-2 users to ensure your whitelisting was successful. As a last resource, we suggest reaching out to your service provider for assistance.
If you need further assistance, kindly contact our support at support@cytechint.com for prompt assistance and guidance.
Whitelist for Harmony Email & Collaboration in Microsoft 365 and Google Workspace
If your organization uses Harmony Email & Collaboration (formally Avanan), you can whitelist CyTech in Microsoft 365 and Google Workspace to ensure that our simulated phishing and training notification emails are delivered. To whitelist CyTech, you can create rules in Microsoft 365 and Google Workspace to communicate to Harmony Email & Collaboration that messages from CyTech don't need to be blocked or filtered. These rules can help our emails reach your users' Microsoft Exchange and Gmail inboxes.
If you experience issues whitelisting CyTech for Avanan, we recommend directly reaching out to Harmony Email & Collaboration for assistance. You can also contact our support team and we'll be happy to assist you.
Important: Some whitelisting configurations may not be available in environments outside of the US.
Whitelisting in Harmony Email & Collaboration for Microsoft 365
To whitelist CyTech in Microsoft 365, you will need to create a mail flow rule in the Exchange admin center. This rule will look for CyTech’s IP addresses and add a header that lets Harmony Email & Collaboration know that the email is safe.
To set up this mail flow rule, follow the steps below:
- Log in to your Microsoft Admin console.
- From the navigation panel, navigate to Admin centers > Exchange. You can also access the Exchange admin center by navigating to admin.exchange.microsoft.com.
- From the navigation panel, navigate to Mail flow > Rules.
- At the top of the page, click Add a rule.
- From the drop-down menu, select Create a new rule. The New transport rule pop-up window will open.
- In the Name field, enter a name for the rule, such as "CyTech whitelisting".
- In the Apply this rule if drop-down menu, select the sender. Then, select IP address is any of these ranges or exactly matches. When you select this option, a specify IP address ranges pop-up window will display.

- In the pop-up window, enter CyTech’s IP addresses. After entering each IP address, click Add. Note: Contact CyTech for a list of IPs or hostnames.
- After you've entered all the IP addresses, click Save.

- In the Do the following drop-down menu, select Modify the message properties. Then select set a message header.

- Click the first Enter text option under the Do the following menu.
- The message header pop-up window will open. In the text field, enter "X-CLOUD-SEC-AV-Info" into the field.
- Click the Save.

- Select the second Enter text option.
- The message header pop-up window will open. In the text field, enter "[portalname],office365_emails,inline", but replace "[portalname]" with the name of your Avanan Harmony Email & Collaboration portal.
- Click the Save.

- Click Next at the bottom of the page. You’ll be taken to the Set rule settings page.
- In the Rule mode section, select Enforce.
- Select the Stop processing more rules check box.

- Click Next at the bottom of the page. You’ll be taken to the Review and finish page.
- Ensure your settings are correct, then click Finish.

- Move the priority of the rule you just made above your Avanan Harmony Email - Protect mail flow rule.
Whitelisting in Harmony Email & Collaboration for Google Workspace
To whitelist CyTech for Gmail, you will need to create a new content compliance rule and modify an existing Harmony Email & Collaboration rule. The new rule will identify CyTech’s IP addresses and add a header that lets Harmony Email & Collaboration know that the message is safe. Creating this rule will prevent SmartPhish and any sandboxing tools that your organization uses from blocking simulated phishing tests and training notifications.
First, create a content compliance rule by following the steps below:
- Log in to your Google Admin console.
- From the Admin console home page, navigate to Apps > Google Workspace > Gmail.
Tip: If you manage more than one organization, select the organization where you would like to apply the rule from the navigation panel.
- Select the Compliance section.
- Navigate to the Content Compliance subsection.
- Click the Configure or Add Another button, depending on whether you have already added a rule. The Add setting pop-up window will open.

- Under Content compliance, enter a description of this rule, such as "CyTech whitelisting".
- In the Email messages to affect section, select the Inbound check box.

- In the Expressions section, click Add. A pop-up window will open.

- In the first drop-down menu, select Metadata match.
- Under the Attribute drop-down menu, select Source IP.
- In the Match type drop-down menu, select the Source IP is within the following range.
- In the Match type field, enter one of CyTech’s IP addresses. Note: Contact CyTech for a list of IPs.

- Click Save. Repeat steps 8-12 for each of CyTech’s IP addresses.
- Below the Expressions section, click Add.

- In the first drop-down menu, select Metadata match.
- Under the Attribute drop-down menu, select Source IP.
- In the Match type drop-down menu, select Source IP is not within the following range.
- In the Match type text box, enter one of CyTech’s IP addresses.
- Click Save.

- Repeat steps 14-19 for each of CyTech’s IP addresses.
- In the Headers section, select the Add custom headers check box.
-
In the Custom headers field, click Add.

-
In the Header key field, enter "X-CLOUD-SEC-AV-Info".
-
In the Header value field, enter "[portalname],google_mail,inline", but replace "[portalname]"with the name of your Harmony Email & Collaboration portal.
-
Click Save.

-
Review your settings, then click Save.
If you need further assistance, kindly contact our support at support@cytechint.com for prompt assistance and guidance.
Whitelist in Barracuda
If you're utilizing Barracuda's Email Security Gateway, you can whitelist CyTech to allow our simulated phishing test emails and training notifications through to your end-users.
The instructions below are for a third-party software. If you run into issues whitelisting CyTech in Barracuda, we recommend reaching out to Barracuda for specific instructions. You can also contact our support team whenever you need assistance.
Whitelisting by IP in Barracuda in Email Security Gateway
These instructions were gathered and summarized–based on Barracuda's knowledgebase. For more information on how to whitelist in Barracuda, check out the Barracuda Email Security Service - Configuring Inbound Email video.
If you are using Barracuda's Email Security Service (cloud), follow these steps to whitelist Barracuda by IP address:
- Log in to your Barracuda Cloud Control.
- Go to Email Security > Inbound Settings > IP Address Policies.
- In the IP Blocking / Exemption section, use the top line to enter one of our IP addresses. This process will need to be repeated for each IP address. Note: Contact CyTech for the list of IPs.
- In the Netmask field, type 255.255.255.255. Note: Barracuda does not allow for IP address ranges, so the first IP range should be 147.160.167.0 with a netmask of 255.255.255.192. Entering the IP range this way will cover the entire range. The single addresses will have a netmask of 255.255.255.255.
- Set the Policy field to Exempt.
- If you'd like, add a note in the Comment field. For example, CyTech Simulated Phishing IP Address.
- Click Add to whitelist the IP address.
- Repeat steps 2 through 7 for each of the CyTech IP addresses.
If you are using Barracuda's Email Security Gateway (on-premises), follow these steps to whitelist Barracuda by IP address:
- Log in to your Barracuda Email Security Gateway web interface.
- Go to the BLOCK/ACCEPT > IP Filters page.
- In the Allowed IP/Range section, use the top line to enter one of our IP addresses. This process will need to be repeated for each IP address. Note: Contact CyTech for the list of IPs.
- In the Netmask field, type 255.255.255.255.
Note: Barracuda does not allow for IP address ranges, so the first IP range should be 147.160.167.0 with a netmask of 255.255.255.192. Entering the IP range this way will cover the entire range. The single addresses will have a netmask of 255.255.255.255.
- Set the Policy field to Exempt.
- If you'd like, add a note in the Comment field. For example, CyTech Simulated Phishing IP Address.
- Click Add to whitelist the IP address.
- Repeat steps 2 through 7 for each of the CyTech IP addresses.
Barracuda Intent Analysis
You may need to whitelist us in Barracuda's Intent Analysis feature to prevent the URLs in simulated phishing tests from being altered and potentially resulting in skewed phishing test results. See the Intent Analysis - Inbound Mail article from Barracuda explaining this process.
If you are using Barracuda's Email Security Service (cloud), follow these steps to whitelist Barracuda's Intent Analysis:
- Log in to your Barracuda Cloud Control.
- Navigate to Email Security > Inbound Settings > Anti-Phishing.
- Under the Intent section, add CyTech's hostnames. Make sure the Policy drop-down menu is set to Ignore.
If you are using Barracuda's Email Security Gateway (on-premises), follow these steps to whitelist Barracuda's Intent Analysis:
- Log in to your Barracuda Email Security Gateway web interface.
- Navigate to Email Security Gateway > Basic > Spam Checking.
- Under the Intent Analysis section, add CyTech's hostnames to the URI Exemptions: text box field.
Barracuda Sender Authentication
If you'd like to spoof your own domain in simulated phishing tests, you can exempt Trusted Forwarder IP addresses from SPF checks. See the How to Configure Sender Policy Framework article from Barracuda for more information.
If you are using Barracuda's Email Security Service (cloud), follow these steps to whitelist Barracuda's Sender Authentication:
- Log in to your Barracuda Cloud Control.
- Navigate to Email Security > Inbound Settings > Sender Authentication.
- In the Use Sender Policy Framework center enter our IP addresses in the SPF exemptions table.
If you are using Barracuda's Email Security Gateway (on-premises), follow these steps to whitelist Barracuda's Sender Authentication:
- Log in to your Barracuda Email Security Gateway web interface.
- Navigate to Email Security > Block/Accept tab and select Sender Authentication.
- Under Sender Policy Framework (SPF) Configuration section, select Yes.
- Add the CyTech IP addresses to the exemption list.
Note: After following this article, we recommend setting up a test phishing campaign for 1-2 users to ensure your whitelisting was successful. As a last resource, we suggest reaching out to your service provider for assistance.
Barracuda Advanced Threat Protection (ATP)
If you are using Barracuda's Advanced Threat Protection (ATP) and have experienced false clicks or false attachment opens, you can set up exemptions. Setting up exemptions allows you to bypass PDF scanning for phishing test emails from CyTech's IP addresses.
To set up exemption addresses to bypass ATP PDF Scanning:
- Log in to your Barracuda Email Security Gateway web interface.
- Select the ATP Settings tab.
- Enter the IP address(es) and Subnet Mask(s). Note: Contact CyTech for the list of IPs.
- Click Add.
Barracuda Sentinel Allow Senders
Using Barracuda Sentinel’s Allow Senders list allows CyTech emails to bypass your organization’s current whitelisting rules. See Barracuda’s How to Allow Senders article for more information.
To add specific senders to your Allow Senders list:
- Log in to your Barracuda admin console.
- Click Dashboard in your console menu.
- Click the Settings icon, which should appear as a gear.
- Click Allowed Senders.
- Enter one email address or domain name into the Sender Email or Domain field.
Note: Barracuda Sentinel will only allow you to enter one email address or domain name at a time for security reasons. You can repeat steps 5 through 7 for as many email addresses or domains you wish to add.
- You can add a comment to your email address or domain name if you wish.
- Click Save.
You can also delete or edit the email addresses and domain names from the Allowed Senders page using their respective icons.
If you need further assistance, kindly contact our support at support@cytechint.com for prompt assistance and guidance.
Whitelisting in EdgeWave
Setup
To allow phishing messages through the filter you enable the "Accept Security Awareness test messages." option in the domain settings. Go to Manage > Domains and click on your domain name (Or search for your domain in the search box) then in the Filtering Options section look for the checkbox shown below. NOTE: Only enable the option when you are conducting phishing tests on your users and then disable it when complete.
Additional Configuration For Hosted/Cloud Filtering Customers
If you are using the ePrism Cloud based solution (no on premise appliance) you will need to contact Technical Support, wavesupport@edgewave.com or 800 782 3762 to have the vendors IP addresses whitelisted as well. Please have the vendor's IP information available.
Additional Configuration For Appliance Customers
The vendor/sender's IP addresses will have to be added to the Sender Allow List, in the appliance dashboard to ensure reliable delivery. Go to the IP address of the appliance and log into the "Appliance Dashboard" then go to Settings > SMTP and add the IP address(es) into the "Sender Allow List."
Note: Contact CyTech for the list of IPs.
If you need further assistance, kindly contact our support at support@cytechint.com for prompt assistance and guidance.
Creating an allowed senders filter list for Forefront Protection for Exchange
Forefront Protection 2010 for Exchange Server (FPE) provides allowed senders lists so that you can maintain lists of safe e-mail addresses or e-mail domains that are not subjected to filtering. (The allowed sender lists have no effect on scanning for malware and can only be used with the transport scan job.) FPE checks the sender address or domain against the allowed senders list. If the e-mail address or domain appears on the allowed senders list, FPE bypasses all filtering that has been enabled for the list.
Note: Allowed senders filter lists allow specified senders to bypass filtering. However, you cannot bypass filtering for recipients.
To create an allowed senders filter list
-
In the Forefront Protection 2010 for Exchange Server Administrator Console, click Policy Management, and then under the Filters section, click Filter Lists.
-
In the Filters – Filter Lists pane, click the Create button.
-
In the Select Filter Type dialog box, select Allowed senders and then click Next.
-
In the Filter Details dialog box, specify the filter list name and filter details:
-
In the Filter list name box, type a name for the new list.
-
In the Filter criteria box, type the e-mail address or e-mail domain to be included in the filter list, and then click Add.
User addresses should be entered in the following format: user@customer.com
E-mail domain names should be entered in the following format: domain.com, domain.edu, domain.org, and so on.
You can repeat this process in order to add multiple addresses or domains, or you can add multiple items on the same line, provided that they are separated by a comma.
-
Note: You can edit items in an allowed sender's filter list by double-clicking the item, editing the item, and then pressing ENTER. You can delete items from an allowed sender's filter list by selecting the item and clicking Remove. You can also import items into an allowed sender's filter list.
-
-
To configure the filtering options that will be bypassed for the e-mail addresses or domains specified in the list, you can select the following check boxes:
**File—**Skips file filtering.
**Keyword—**Skips keyword filtering.
**Content—**Skips subject line and sender-domain filtering.
-
Click Next.
-
- In the Target dialog box, configure how you want the filter list to be applied to the Hub/Edge Transport Scan:
- To enable the filter list for use with the transport scan, using the Enabled drop-down list, select Yes (this is the default).
- Click Create.
- The filter list you just created appears on the Filters – Filter Lists pane.
- Click Save.
If you need further assistance, kindly contact our support at support@cytechint.com for prompt assistance and guidance.
Whitelist in Fortinet FortiGate
Fortinet's FortiGate web filter can be configured to allow access to CyTech's phish and landing domains. We recommend whitelisting CyTech in Fortigate's web filter if your users experience issues accessing our landing pages (upon failing a phishing test).
The instructions below include information from FortiGate's Static URL Filter article. If you run into issues whitelisting CyTech in FortiGate, we recommend reaching out to FortiGate for specific instructions. You can also contact our support team whenever you need assistance.
Whitelisting by Static URL Filter
You can allow access to our phish and landing domains by adding them to your Static URL Filter list in your Fortigate firewall. The FortiGate web filter allows web pages matching the URLs you specify.
Note: Whitelisting with web rating overrides is another method of whitelisting offered by Fortinet. This method is for organizations using Fortiguard categories. For more information on this method, please see Fortinet's Web rating override article.
After following this article, we recommend setting up a test phishing campaign for 1-2 users to ensure your whitelisting was successful. As a last resource, we suggest reaching out to your service provider for assistance.
If you need further assistance, kindly contact our support at support@cytechint.com for prompt assistance and guidance.
Whitelist in McAfee or MX Logic
If your organization is using McAfee or MX Logic, you will need to whitelist CyTech's IPs as "Allowed Senders" to allow our phishing and training-related emails through to your end users. You can also whitelist by our mail server hostnames in this area, although we recommend IP in most cases.
You can modify your policy-level Allowed Senders list by following the steps below. This new policy will allow any inbound mail flow originating from those three IP addresses to bypass the spam and content filters in McAfee/MX Logic.
Setup
The instructions below are for a third-party software. If you run into issues whitelisting CyTech in McAfee/MXLogic, we recommend reaching out to McAfee/MX Logic for specific instructions. You can also contact our support team whenever you need assistance.
- Login to the Control Console. Select the Email Protection tab, and then the Policies tab.
- Highlight the inbound policy you wish to change and click Edit.
- Click the Allow/Deny tab, then add our IP addresses to the Add Address box. Note: Contact CyTech for the list of IPs or Hostname
- Enable the checkbox for Bypass attachment policy if you plan on sending phishing tests with attachments on them. (Recommended)
- Click Add.
- Click Save. There may be a 20-minute delay for the changes to take place.
Note: After following this article, we recommend setting up a test phishing campaign to 1-2 users to ensure your whitelisting was successful. As a last resource, we suggest reaching out to your service provider for assistance.
If you need further assistance, kindly contact our support at support@cytechint.com for prompt assistance and guidance.
Whitelist in Mimecast
If you're using Mimecast's services, you can whitelist CyTech to allow our simulated phishing test emails and training notifications through to your end users.
Below you'll find instructions for several different policies you'll need to add to your Mimecast console to allow the use of CyTech's various services. The policies below are in a suggested order for the highest probability of success for your phishing security tests.
Each Mimecast policy section has a description of the policy's purpose regarding CyTech's phishing security test features.
If you run into issues whitelisting CyTech in your Mimecast services, we recommend reaching out to Mimecast for specific instructions. You can also contact our Support team whenever you need assistance.
Anti-Spoofing Policy
Follow the steps below to allow CyTech to send emails appearing to come from an email address at your domain, on your behalf.
- Log in to your Mimecast Administration Console.
- Click the Administration toolbar button.
- Select the Gateway | Policies menu item.
- Select Anti-Spoofing from the list of policies displayed.
- Select the New Policy button.
- Select the appropriate policy settings under the Options, Emails From, Emails To, and Validity sections. For more information on these settings, see Mimecast's Configuring an Anti-Spoofing Policy article.
- Select the Policy Override check box.
- In the Source IP Ranges field (shown below), enter our IP ranges. Note: Contact CyTech for the list of IPs.

Be sure to save the policy. This should allow the simulated phishing templates appearing to come from your organization's domain, to successfully reach your users' inboxes. We suggest setting up a test campaign to yourself or a small group of people to ensure the policy works as intended, before sending a campaign to all of your users.
Permitted Senders Policy
To successfully whitelist our phishing and training-related emails when using Mimecast, you should Create a new Permitted Sender policy to allow our phishing and training-related emails through to your users' inbox.
Important: Do not edit your default Permitted Sender policy. A new one must be created.
Follow the steps below to allow CyTech emails to arrive successfully in your users' inboxes.
- Log in to your Mimecast Administration Console.
- Click the Administration toolbar button.
- Select the Gateway | Policies menu item.
- Select Permitted Senders from the list of policies displayed.
- Select the New Policy button.
- Select the appropriate policy settings under the Options, Emails From, Emails To, and Validity sections. For more information on these settings see Mimecast's Configuring a Permitted Senders Policy article.
- Select the Policy Override check box.
- In the Source IP Ranges field (shown below), enter the appropriate IP ranges for your CyTech account's location.
Note: Contact CyTech for the list of IPs.

Be sure to save the policy. We suggest setting up a test campaign to yourself or a small group of people to ensure the policy works as intended, before sending a campaign to all of your users.
Attachment Protection Bypass Policy
If you'd like to use attachments in your simulated phishing tests, follow the steps below to increase the likelihood that emails with attachments from CyTech will successfully arrive in your users' inboxes. Mimecast may still prevent the delivery of attachments. Set up a test after creating this policy to ensure your desired attachment goes through.
- Log in to your Mimecast Administration Console.
- Click the Administration toolbar button.
- Select the Gateway | Policies menu item.
- Select Attachment Protection Bypass from the list of policies displayed.
- Select the New Policy button.
- Select the appropriate policy settings under the Options, Emails From, Emails To, and Validity sections. For more information on these settings, see Mimecast's Configuring Attachment Protection Bypass Policies article.
- Select the Policy Override check box.
- In the Source IP Ranges field (shown below), enter the appropriate IP ranges for your CyTech account's location.
Note: Contact CyTech for the list of IPs.

Be sure to save this new policy. After allowing time for this new rule to propagate, we recommend setting up a phishing campaign to yourself, or a small group to test out the various attachment types.
URL Protection Bypass Policy
Mimecast's URL Protection service scans and checks links in emails upon delivery. This can sometimes result in false positives for your phishing security tests. Follow the steps below to create a URL Protection Bypass policy for accurate phishing security test results.
- Log in to your Mimecast Administration Console.
- Click the Administration toolbar button.
- Select the Gateway | Policies menu item.
- Select URL Protection Bypass from the list of policies displayed.
- Select the New Policy button.
- Select the appropriate policy settings under the Options, Emails From, Emails To, and Validity sections. For more information on these settings, see Mimecast's Configuring a URL Protection Bypass Policy article.
- Select the Policy Override check box.
- In the Source IP Ranges field (shown below), enter the appropriate IP ranges for your CyTech account's location.
Note: Contact CyTech for the list of IPs.

Be sure to save the policy. We suggest setting up a test campaign to yourself or a small group of people to ensure the policy works as intended, before sending a campaign to all of your users.
Impersonation Protection Bypass Policy
If you’re sending whaling/phishing emails purporting to come from users/domains that look like they are internal to your organization, you'll want to create an Impersonation Protection Policy in your Mimecast console.
Impersonation Protection Bypass Policy
- Log in to your Mimecast Administration Console.
- Click the Administration toolbar button.
- Select the Gateway | Policies menu item.
- Select Impersonation Protection Bypass from the list of policies displayed.
- Select the New Policy button.
- Select the appropriate policy settings under the Options, Emails From, Emails To, and Validity sections. For more information on these settings, see Mimecast's Configuring an Impersonation Protection Bypass Policy article. Note: In the Select Option field under Options, select the impersonation protection definition you want to be bypassed. If you have multiple definitions you would like to bypass, you will need to create a separate Impersonation Protection Bypass Policy for each one.
- Select the Policy Override check box.
- In the Source IP Ranges field (shown below), enter the appropriate IP ranges for your CyTech account's location.
Note: Contact CyTech for the list of IPs.

Be sure to save the policy. We suggest setting up a test campaign to yourself or a small group of people to ensure the policy works as intended, before sending a campaign to all of your users.
Attachment Management Bypass Policy
If you'd like to use attachments in your simulated phishing tests, follow the steps below to prevent attachments from being stripped from emails, potentially resulting in skewed test results.
- Log in to your Mimecast Administration Console.
- Click the Administration toolbar button.
- Select the Gateway | Policies menu item.
- Select Attachment Management Bypass from the list of policies displayed.
- Select the New Policy button.
- Select the appropriate policy settings under the Options, Emails From, Emails To, and Validity sections. For more information on these settings, see Mimecast's Configuring Attachment Management Bypass Policies article.
- Select the Policy Override check box.
- In the Source IP Ranges field (shown below), enter the appropriate IP ranges for your CyTech account's location.
Note: Contact CyTech for the list of IPs.

Be sure to save the policy. We suggest setting up a test campaign to yourself or a small group of people to ensure the policy works as intended, before sending a campaign to all of your users.
Greylisting Bypass Policy
You may want to set up this policy if want to prevent Mimecast from preventing emails from being deferred. Below are instructions on how to add this policy.
- Log in to your Mimecast Administration Console.
- Click the Administration toolbar button.
- Select the Gateway | Policies menu item.
- Select Greylisting from the list of policies displayed.
- Select the New Policy button.
- Select the appropriate policy settings under the Options, Emails From, Emails To, and Validity sections. For more information on these settings, see Mimecast's Configuring Greylisting Policies article.
- Select the Policy Override check box.
- In the Source IP Ranges field (shown below), enter the appropriate IP ranges for your CyTech account's location. Note: Contact CyTech for the list of IPs.
- Click Save and Exit to save the changes.

Preventing Mimecast from Re-Writing Phishing Links
If you'd like to prevent Mimecast from re-writing the links in the Phishing tests you send, you can do so by adding CyTech's phish link domains as Permitted URLs in Mimecast. You can find a list of our phish link domains in the Phishing tab of your KSAT console under Domains. Our support team can provide a list of our phish link domains.
Keep in mind, we don't recommend creating an exception for this unless you also have exceptions for other senders already in place. Otherwise, seeing anything other than a rewritten Mimecast URL will be a red flag for users and may skew your results.
For more information on disabling link rewriting on permitted URLs, see Mimecast's Targeted Threat Protection: Managed URLs article.
DNS Authentication Bypass Policy (Optional)
If you are having issues with our emails being sent to your spam folder or being quarantined, you may want to set up this additional policy. First, you'll need to set up the inbound definition and then you can create the policy. Below are instructions on how to add this policy.
DNS Authentication - Inbound Definition Setup
- Log in to your Mimecast Administration Console.
- Select the Gateway | Policies menu item.
- Click the Definitions drop-down menu and select the DNS Authentication - Inbound option.
- Select New DNS Authentication - Inbound Checks.
- Create a name for the definition and leave all options unchecked.
- Click Save and Exit to save your changes.
DNS Authentication - Inbound Policy Setup
- Log in to your Mimecast Administration Console.
- Select the Gateway | Policies menu item.
- Click the DNS Authentication - Inbound policy.
- Select New Policy.
- Specify the following settings listed in the image below:

- Enter the CyTech IP ranges into the Source IP ranges field.
- Check the Policy Override option.
- Click Save and Exit to save the changes.
CyberGraph Policy (Optional)
If you’re having issues with Mimecast removing CyTech’s email trackers, you can set up this policy. Mimecast’s CyberGraph Policy will prevent email trackers from being removed. To set up the CyberGraph policy, follow the steps below:
- Log in to your Mimecast Administration console.
- Navigate to Services > CyberGraph.
- Click Create New Policy.
- Enter a Name for the policy, such as “CyTech CyberGraph Policy”.
- (Optional) Enter a Description for the policy.
- In the Dynamic Banners field, select Disabled.
- In the Trackers field, select Disabled.
- In the User Reporting field, select Disabled.
- Click Next.
- In the Applies To section, set the From field to Everyone. Then, set the To field to Everyone.
- In the Source IP Ranges field, enter CyTech’s IP addresses. Note: Contact CyTech for the list of IPs.
- Click Next. You’ll be taken to the Summary page to confirm your settings are correct.
- In the Policy Status field, click Enabled.
- Click Create New Policy.

Troubleshooting
Note: After following the steps in this article, we recommend that you set up a test phishing campaign containing one or two users to make sure your whitelisting was successful.
If your whitelisting was unsuccessful, we recommend that you reach out to Mimecast for additional help.
If you're experiencing issues with false positives and the Journaling feature is enabled for your Mimecast account, you may need to add our phishing domains to your Managed URLs. For more information, see Mimecast's Targeted Threat Protection: Managed URLs article. For a list of our phishing domains, please contact our support team.
If you need further assistance, kindly contact our support at support@cytechint.com for prompt assistance and guidance.
Whitelist in Proofpoint
If you're using Proofpoint Essential's spam filtering or Proofpoint Enterprise's Allowlist, you can whitelist CyTech to allow our simulated phishing test emails and training notifications through to your end users.
The instructions below are for third-party software. If you run into issues whitelisting CyTech in Proofpoint, we recommend reaching out to Proofpoint for specific instructions. You can also contact our support team whenever you need assistance.
Whitelisting in Proofpoint Essentials
When you're ready to whitelist in Proofpoint Essentials, follow the below instructions. These instructions were gathered from Proofpoint's Safelisting Addresses article.
If you have issues with attachment-related emails, see Proofpoint's article on Blocks by Default.
Whitelisting in Proofpoint Enterprise
To whitelist in Proofpoint Enterprise, follow the below instructions. If you experience any issues with these steps, please contact our support team for assistance.
To avoid potential issues with Proofpoint’s Targeted Attack Protection, we suggest that you add CyTech’s IP addresses to Proofpoint’s URL Defense. To add CyTech's IP addresses to Proofpoint's URL Defense, follow the steps below:
How to Prevent Proofpoint from Bouncing Emails
If some of your phishing security test (PST) emails are bouncing with an error message of "Sender address rejected: Domain not found (in reply to RCPT TO command)",follow the instructions below to resolve this issue.
- From your CyTech console, click your email address in the top right corner and select Account Settings.
- Navigate to the Phishing Settings section.
- Check that the Overwrite Fixed Return-path Address with Sender Address option is not enabled (see below).
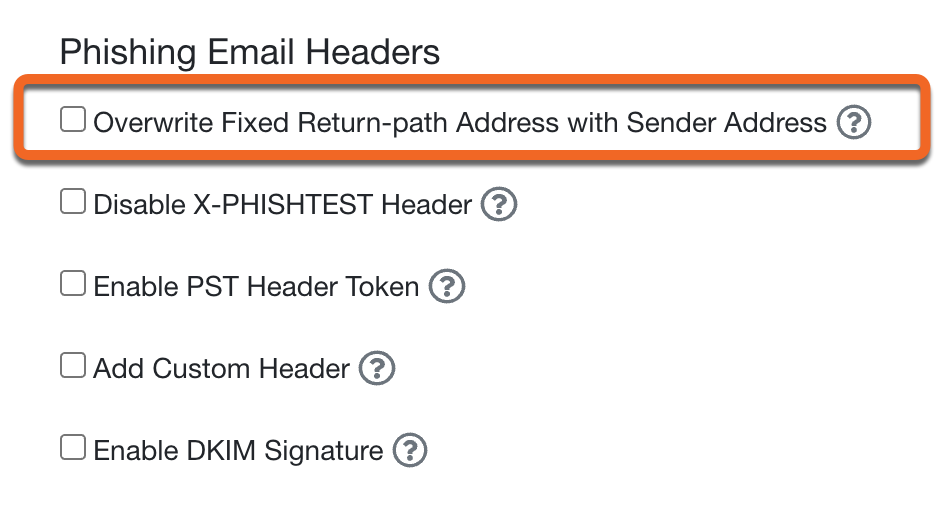
- Be sure to save this change by clicking the Save Changes button at the bottom of the page.
- To confirm this change will prevent Proofpoint from causing your PST emails to bounce, we recommend you test this change. You can do this by sending a test campaign to yourself or a limited number of users before sending it to a larger group.
What to Do If Your Emails are Going to Spam
If your emails are being sent to spam or are being quarantined, you'll need to add CyTech to the Organizational Safe List in Proofpoint.
Follow the instructions below to add CyTech's hostnames or IP addresses to the Organizational Safe List:
- From your Proofpoint admin center, navigate to Email Protection > Spam Detection > Organizational Safe List.
- Add either our hostnames or IP addresses.
Note: Contact CyTech for a list of IPs.
If you need further assistance, kindly contact our support at support@cytechint.com for prompt assistance and guidance.
Whitelist in SonicWall
Whitelisting in your SonicWall services will allow your users to receive phishing and training-related emails from the CyTech console.
The instructions below include information from the How can I add/import email addresses to allowed or blocked List on Email security device and How to Exclude an IP Address, Range of IP addresses or Group of IP addresses articles, provided by SonicWall. If you run into issues whitelisting CyTech in your SonicWall appliance, we recommend reaching out to SonicWall for specific instructions. You can also contact our support team whenever you need assistance.
Whitelisting by IP in SonicWall's Email Security Device
Follow these instructions to whitelist the CyTech mail servers by IP address:
- Log in to your SonicWall appliance as an admin and click Manage.
- Under the Security Services section, click Anti-Spam > Address Book > Allowed.
- Click Add.
- From the Select list type drop-down menu, select IPs.
- In the text box below, enter the IP addresses for CyTech accounts. You will need to separate each IP address with a carriage return. Note: For a list of our IP addresses, contact CyTech.
- Once you've entered the IP addresses, click Add.
Whitelisting by Group of IP Addresses in SonicWall's CFS Policy
Follow these instructions to whitelist the CyTech mail servers by IP address:
- Log in to your SonicWall management page and click Policies > Objects.
- Under Address Objects, click Add.
- Add the IP information for the IP address you would like to exclude and click Add.
- Repeat until you've added all three IP addresses.
- From Policies > Objects, select Add under Address Groups.
- Enter a name for the Exclusion Group.
- Highlight the IP addresses you want to include in the group and click the right-facing arrow to move them to the box on the right.
- Click OK.
- Log in to your SonicWall appliance as an admin and click Manage.
- From Security Services > Content Filter > Excluded Address, select the exclusion group you created from the drop-down menu.
- Click ACCEPT.
If you need further assistance, kindly contact our support at support@cytechint.com for prompt assistance and guidance.
Whitelist in Sophos
Sophos Firewalls
Whitelisting in Sophos firewall allows users who've failed your phishing tests to access CyTech's landing pages.
The instructions below were created for Sophos XG firewalls, so other versions of Sophos firewalls may require a different set of steps. We recommend reaching out to Sophos for specific instructions on how to whitelist CyTech.
To whitelist in Sophos XG firewalls:
- Contact support and request a copy of our phishing domains and landing domains.
- Log in to the portal for the firewall.
- Click on Web, located on the left.
- Click on Exceptions, located at the top.
- If you don’t have an exception list, click Add Exception.
- Provide a name (CyTech) and an optional description for the list.
- Check the boxes to the right under Skip the selected checks or actions for the services you purchased.
- Check URL pattern matches.
- Enter each phish and landing domain, one line at a time, in the Search/Add box. XXXXXX and .com represent each phish and landing domain. For example,
^([A-Za-z0-9.-]*\.)?XXXXXX\.com\.?/ - Click the Save button at the bottom of the page.
Note: After following this article, we recommend setting up a test phishing campaign to 1-2 users to ensure your whitelisting was successful. As a last resource, we suggest reaching out to your service provider for assistance.
If you need further assistance, kindly contact our support at support@cytechint.com for prompt assistance and guidance.
Whitelist in SpamAssassin
If you're utilizing SpamAssassin's spam filtering, you can whitelist CyTech to allow our simulated phishing test emails and training notifications through to your end users.
Although there is typically not an interface for SpamAssassin, you can edit your custom SpamAssassin config file to add rules allowing CyTech's emails through–based on the header and IP address of the phishing tests.
Setup
The instructions below are for a third-party software. If you run into issues whitelisting CyTech in SpamAssassin, we recommend reaching out to SpamAssassin for specific instructions. You can also contact our support team whenever you need assistance.
Below you can see the rules you'll want to add. Please make sure to substitute the text in red with our IP addresses.
Note: Contact CyTech for the list of IPs.
Important: This rule set contains lines for both US and EU IP addresses, you'll only need to include the IPs for the server where your account resides.
|
header __CyTech_HEADER X-PHISHTEST =~ /\bCyTech\b/iheader __CyTech_RCVD_US_001 Received =~ /\[xx\.xx\.xxx\.xxx\]/header __CyTech_RCVD_US_002 Received =~ /\[xx\.xx\.xxx\.xxx\]/header __CyTech_RCVD_US_003 Received =~ /\[xx\.xxx\.xxx\.xxx\]/meta __CyTech_RCVD_US (__CyTech_RCVD_US_001 || __CyTech_RCVD_US_002 || __CyTech_RCVD_US_003) header __CyTech_RCVD_EU_001 Received =~ /\[xx\.xx\.xxx\.xxx\]/header __CyTech_RCVD_EU_002 Received =~ /\[xx\.xx\.xxx\.xxx\]/header __CyTech_RCVD_EU_003 Received =~ /\[xxx\.xxx\.xxx\.xxx\]/meta __CyTech_RCVD_EU (__CyTech_RCVD_EU_001 || __CyTech_RCVD_EU_002 || __CyTech_RCVD_EU_003) meta CyTech (__CyTech_HEADER && (__CyTech_RCVD_US || __CyTech_RCVD_EU)) describe CyTech Mail is from CyTechscore CyTech -20.0
|
Note: After following this article, we recommend setting up a test phishing campaign to 1-2 users to ensure your whitelisting was successful. As a last resource, we suggest reaching out to your service provider for assistance.
If you need further assistance, kindly contact our support at support@cytechint.com for prompt assistance and guidance.
Whitelist in MessageLabs or Symantec.cloud
To successfully whitelist our phishing and training related emails when using MessageLabs or Symantec.cloud, you should add our IP addresses to a global Approved Senders list. This will allow our phishing and training related emails through.
Note: Contact Cytech for a list of IPs.
The instructions below are for a third-party software. If you run into issues whitelisting CyTech in MessageLabs or Symantec.cloud, we recommend reaching out to MessageLabs or Symantec.cloud for specific instructions. You can also contact our support team whenever you need assistance.
Important: Symantec does not recommend sending phishing tests through the Email Security.cloud infrastructure. They recommend sending phishing tests directly to the receiving mail server to avoid having our simulated phishing emails blocked or creating false clicks on your phishing tests. For more information on Symantec's position, please see their article on Phishing Assessment tests and Email Security.cloud.
Setup
To add a global Approved Sender, see the steps below:
- Select Services > Email Services > Anti-Spam.
- Ensure that Global Settings is selected in the domains drop-down list.
- Click the Approved Senders tab.
- Click the Add Entry option.
- The Domain/Email/IP and Description fields become editable.
- In the Domain/Email/IP field enter the IP address of our mail servers. For the most up-to-date list of our IP addresses, please contact CyTech for a list of IPs.
- In the Description field, enter brief details about the new entry.
- To add the entry to the list, click Update.
This new policy will allow any inbound mail flow originating from our IPs to reach your users. Be sure that all three of our sending IPs are added to this list.
Note: After following this article, we recommend setting up a test phishing campaign to 1-2 users to ensure your whitelisting was successful. As a last resource, we suggest reaching out to your service provider for assistance.
If you need further assistance, kindly contact our support at support@cytechint.com for prompt assistance and guidance.
Whitelist in Trend Micro
If you're utilizing Trend Micro's services, you can whitelist CyTech to allow our simulated phishing test emails and training notifications through to your end users. If you run into issues whitelisting CyTech in your Trend Micro services, we recommend reaching out to Trend Micro for specific instructions. You can also contact our Support team whenever you need assistance.
Whitelisting by Domain in Trend Micro
The whitelisting process is broken down into 5 sections. Each section has its own steps for configuration and must be completed to successfully whitelist CyTech.
Note: If you are experiencing false positives, you can try to resolve the issue by whitelisting our phish link domains and our landing page domains.
Advanced Spam Protection
- Navigate to the Advanced Threat Protection tab > Add.
- Select the policy to create based on the service:
- Exchange
- OneDrive
- SharePoint
- Box
- Dropbox
- On the left, select Advanced Spam Protection.
- Check the Enable Advanced Spam Protection option.
- Select the Approved/Blocked Sender List section.
- Check the box next to the Enable the approved sender list option.
- Enter *@CyTech.com in the text field and click the Add > button.

- Select the Rules configuration section.
- Under the Apply to: drop-down menu, select the Incoming messages option.
- For Detection Level:, select the Medium option.

Malware Scanning
- On the left, select Malware Scanning.
- Select the Rules configuration section.
- Under the Apply to: drop-down menu, select the All messages option.
- Under Malware Scanning, select Scan all files and check the box next to Scan message body and Enable IntelliTrap.

- Select the Action configuration section.
- For Action:, select the Trend Micro recommend actions option from the drop-down menu.
- For Notification:, select the Notify option from the drop-down menu.

File Blocking
- On the left, select File Blocking and select Enable File Blocking. We recommend keeping File Blocking on because you cannot limit this option to CyTech messages. Turning off File Blocking could allow potentially malicious attachments through to your users.

Web Reputation
- On the left, select Web Reputation.
- Check the Enable Web Reputation option.
- Select the Rules configuration section.
- Under the Apply to: drop-down menu, select the All messages option.
- For Security Level:, select the Medium option.

- Select the Approved/Blocked URL List section.
- Check the box next to the Enable the approved URL list option.
- Check the box next to the Add internal domains to the approved URL list option.
- Enter the phish link root domains enabled in your KSAT console.
- Then, click the Add > button. Note: You can click the Import button to import URLs in batches.

Virtual Analyzer
- On the left, select Virtual Analyzer.
- Check the Enable Virtual Analyzer option.
- Click the Save button.

Once all steps in each section are completed, your new policy will appear under the Advanced Threat Protection tab.
Note: After following these instructions, we recommend setting up a test phishing campaign to 1-2 users to ensure your whitelisting was successful. As a last resource, we suggest reaching out to your service provider for assistance.
Whitelisting by Email Header in Trend Micro Security
To whitelist by email header in Trend Micro Cloud App Security (CAS), follow the steps below.
- Log in to your KSAT console.
- Click the email address in the top-right corner of the page, then select Account Settings.
- Navigate to Phishing > Phishing Settings.
- Under Phishing Email Headers, select the Enable PST Header Token check box.
- Copy your unique PST Token and save it somewhere you can easily access.

- In a separate window, log in to your Trend Micro CAS account.
- Navigate to ATP Policy | Exchange Online > Web Reputation.
- In the Approved Header Field List section, select the Enable the approved header field list check box.
- In the Name field, enter “X-CYTECHTOKEN”.
- In the Value field, paste your PST Token that you copied earlier.

- Click Add >.
- Click Save.
Whitelisting Trend Micro Hosted Email Security
Trend Micro Hosted Email Security does not allow emails from non-registered domains regardless of whether or not they were added to the Allowed Senders list. For more information, see the Blocked message details article from Trend Micro.
If you need further assistance, kindly contact our support at support@cytechint.com for prompt assistance and guidance.
Whitelist in VIPRE
If your organization uses VIPRE's Email Security for spam filtering, you can whitelist CyTech to allow our simulated phishing emails and training notifications to reach your end users. You can also whitelist CyTech's phishing and landing domains in VIPRE Endpoint Security to allow your users to access phishing test landing pages.
The instructions below are for third-party software. If you have issues whitelisting CyTech in VIPRE, we recommend that you contact VIPRE for assistance.
Whitelisting by IP Address
Typically, we recommend whitelisting our IP addresses in your spam filter. To whitelist our IP addresses with VIPRE Email Security, follow VIPRE's Guided Setup of VIPRE Email Security Cloud and whitelist by IP address.
Note: Contact CyTech for a list of IPs.
Whitelisting by Hostname
If you are unable to whitelist by IP address, you can whitelist our mail server hostnames instead. To whitelist our hostnames with VIPRE Email Security, follow VIPRE's Guided Setup of VIPRE Email Security Cloud article and whitelist by domain.
Note: Contact CyTech for a list hostnames.
Whitelisting Landing Pages
To allow landing pages attached to your phishing campaigns to reach your users, you can whitelist our phishing and landing domains. To whitelist phishing and landing domains in VIPRE Endpoint Security, request the list of root phishing and landing domains from the CyTech support team. Then, see VIPRE's Add Allowed Websites article to add these domains to VIPRE.
Important: You will need to add each domain to a policy manually and individually. However, once you have a list of domains created under one policy, you can copy the list to another policy by using the Copy To… button.
Note: After following the instructions in this article, we recommend setting up a test phishing campaign for one or two users to ensure your whitelisting was successful. If your whitelisting was unsuccessful, we recommend that you contact VIPRE for assistance.
If you need further assistance, kindly contact our support at support@cytechint.com for prompt assistance and guidance.
Whitelist in Google Workspace
Whitelisting Simulated Phishing in Google Workspace (Gmail)
For Secure Practice Simulation Emails
This step-by-step guide is intended for Google Workspace administrators to allow simulated phishing emails from Secure Practice by properly configuring Gmail to recognize and accept messages from specific IP addresses.
Note: You must have an admin role in the Google Workspace Admin Console to perform these actions.
Step 1: Access the Admin Console
-
Visit https://admin.google.com
-
Sign in using your administrator account
Step 2: Navigate to Gmail Settings
-
In the left-hand menu, go to:
Apps → Google Workspace → Gmail -
Under Gmail settings, click on Spam, Phish and Malware

Step 3: Add IPs to the Email Allowlist
-
Click on Email allowlist
- 35.153.237.243(Mail Server)
- 107.22.65.180(Landing Page)
-
Enter the following IP addresses:
-
Click Save

Step 4: Configure Inbound Gateway
This step ensures that Gmail treats the IP addresses above as internal senders, preventing SPF or DMARC validation and suppressing warnings to end-users.
-
Scroll down to the Inbound Gateway section
-
If not already enabled, click the Enable button
-
In the Gateway IPs field, enter the same IP addresses listed earlier
-
Optional:
-
Enable Automatic detect external IP
-
Do not enable “Reject all mail not from gateway IPs” unless already required—this may block all mail delivery if not properly configured
- Enable Require TLS for connections
-

Step 5: Configure Message Tagging
-
Under the Message Tagging section:
-
Check "Message is considered spam if the following header regexp matches"
-
Enter a unique, random string : fg2jl0ah45oahtTK56SGD23fhk2k
-
Check "Disable Gmail spam evaluation"
-
This ensures Gmail skips its spam analysis for messages from the configured IPs.

Step 6: Bypass Spam Filters for Trusted Senders
-
Still under Gmail settings, go to the Spam section
-
Click Configure to create a spam filter bypass rule
-
Check: "Bypass spam filters for messages received from addresses or domains"
-
Click Create or edit list and add the following senders:
- slackj.com
- ttrelli.com
- airbnd.cc
- attlassians.com
- eebbey.com
- lastpasss.net
- my1psswords.com
- zooms.cc
-
For flexibility, uncheck "Authentication required" for
-
Save the address list and the new spam bypass policy

Step 7: Adding Message Header in Compliance
Optional: Temporary Adjustment for Quicker Testing
Google offers a feature called Enhanced Pre-Delivery Message Scanning.
While not recommended to disable permanently, you may consider turning it off briefly to speed up testing and configuration validation.

Additional Systems in Use?
If your organization uses other email or security filtering systems, please refer to the Whitelisting Phishing Overview and ensure proper bypass configurations are in place across all layers.
Reference Documentation Link: https://securepractice.co/guides/whitelisting-google
If you need further assistance, kindly contact our support at support@cytechint.com for prompt assistance and guidance.